Back to hub
Emelia tutorials
Marketing
B2B Prospecting
Launch my first cold-mailing campaign
Published on Jun 4, 2022Updated on Aug 7, 2025
Hello everyone! We hope that everything is going well for you and that your business is doing well. In this cold mailing tutorial, we will see how to make an email campaign on Emelia. And you'll see that it couldn't be easier! We offer you on our software all the features to be efficient without difficulty. No more complicated words and nights spent breaking your head to set up your campaign, we will make it easier for you, let's go:
Main Dashboard
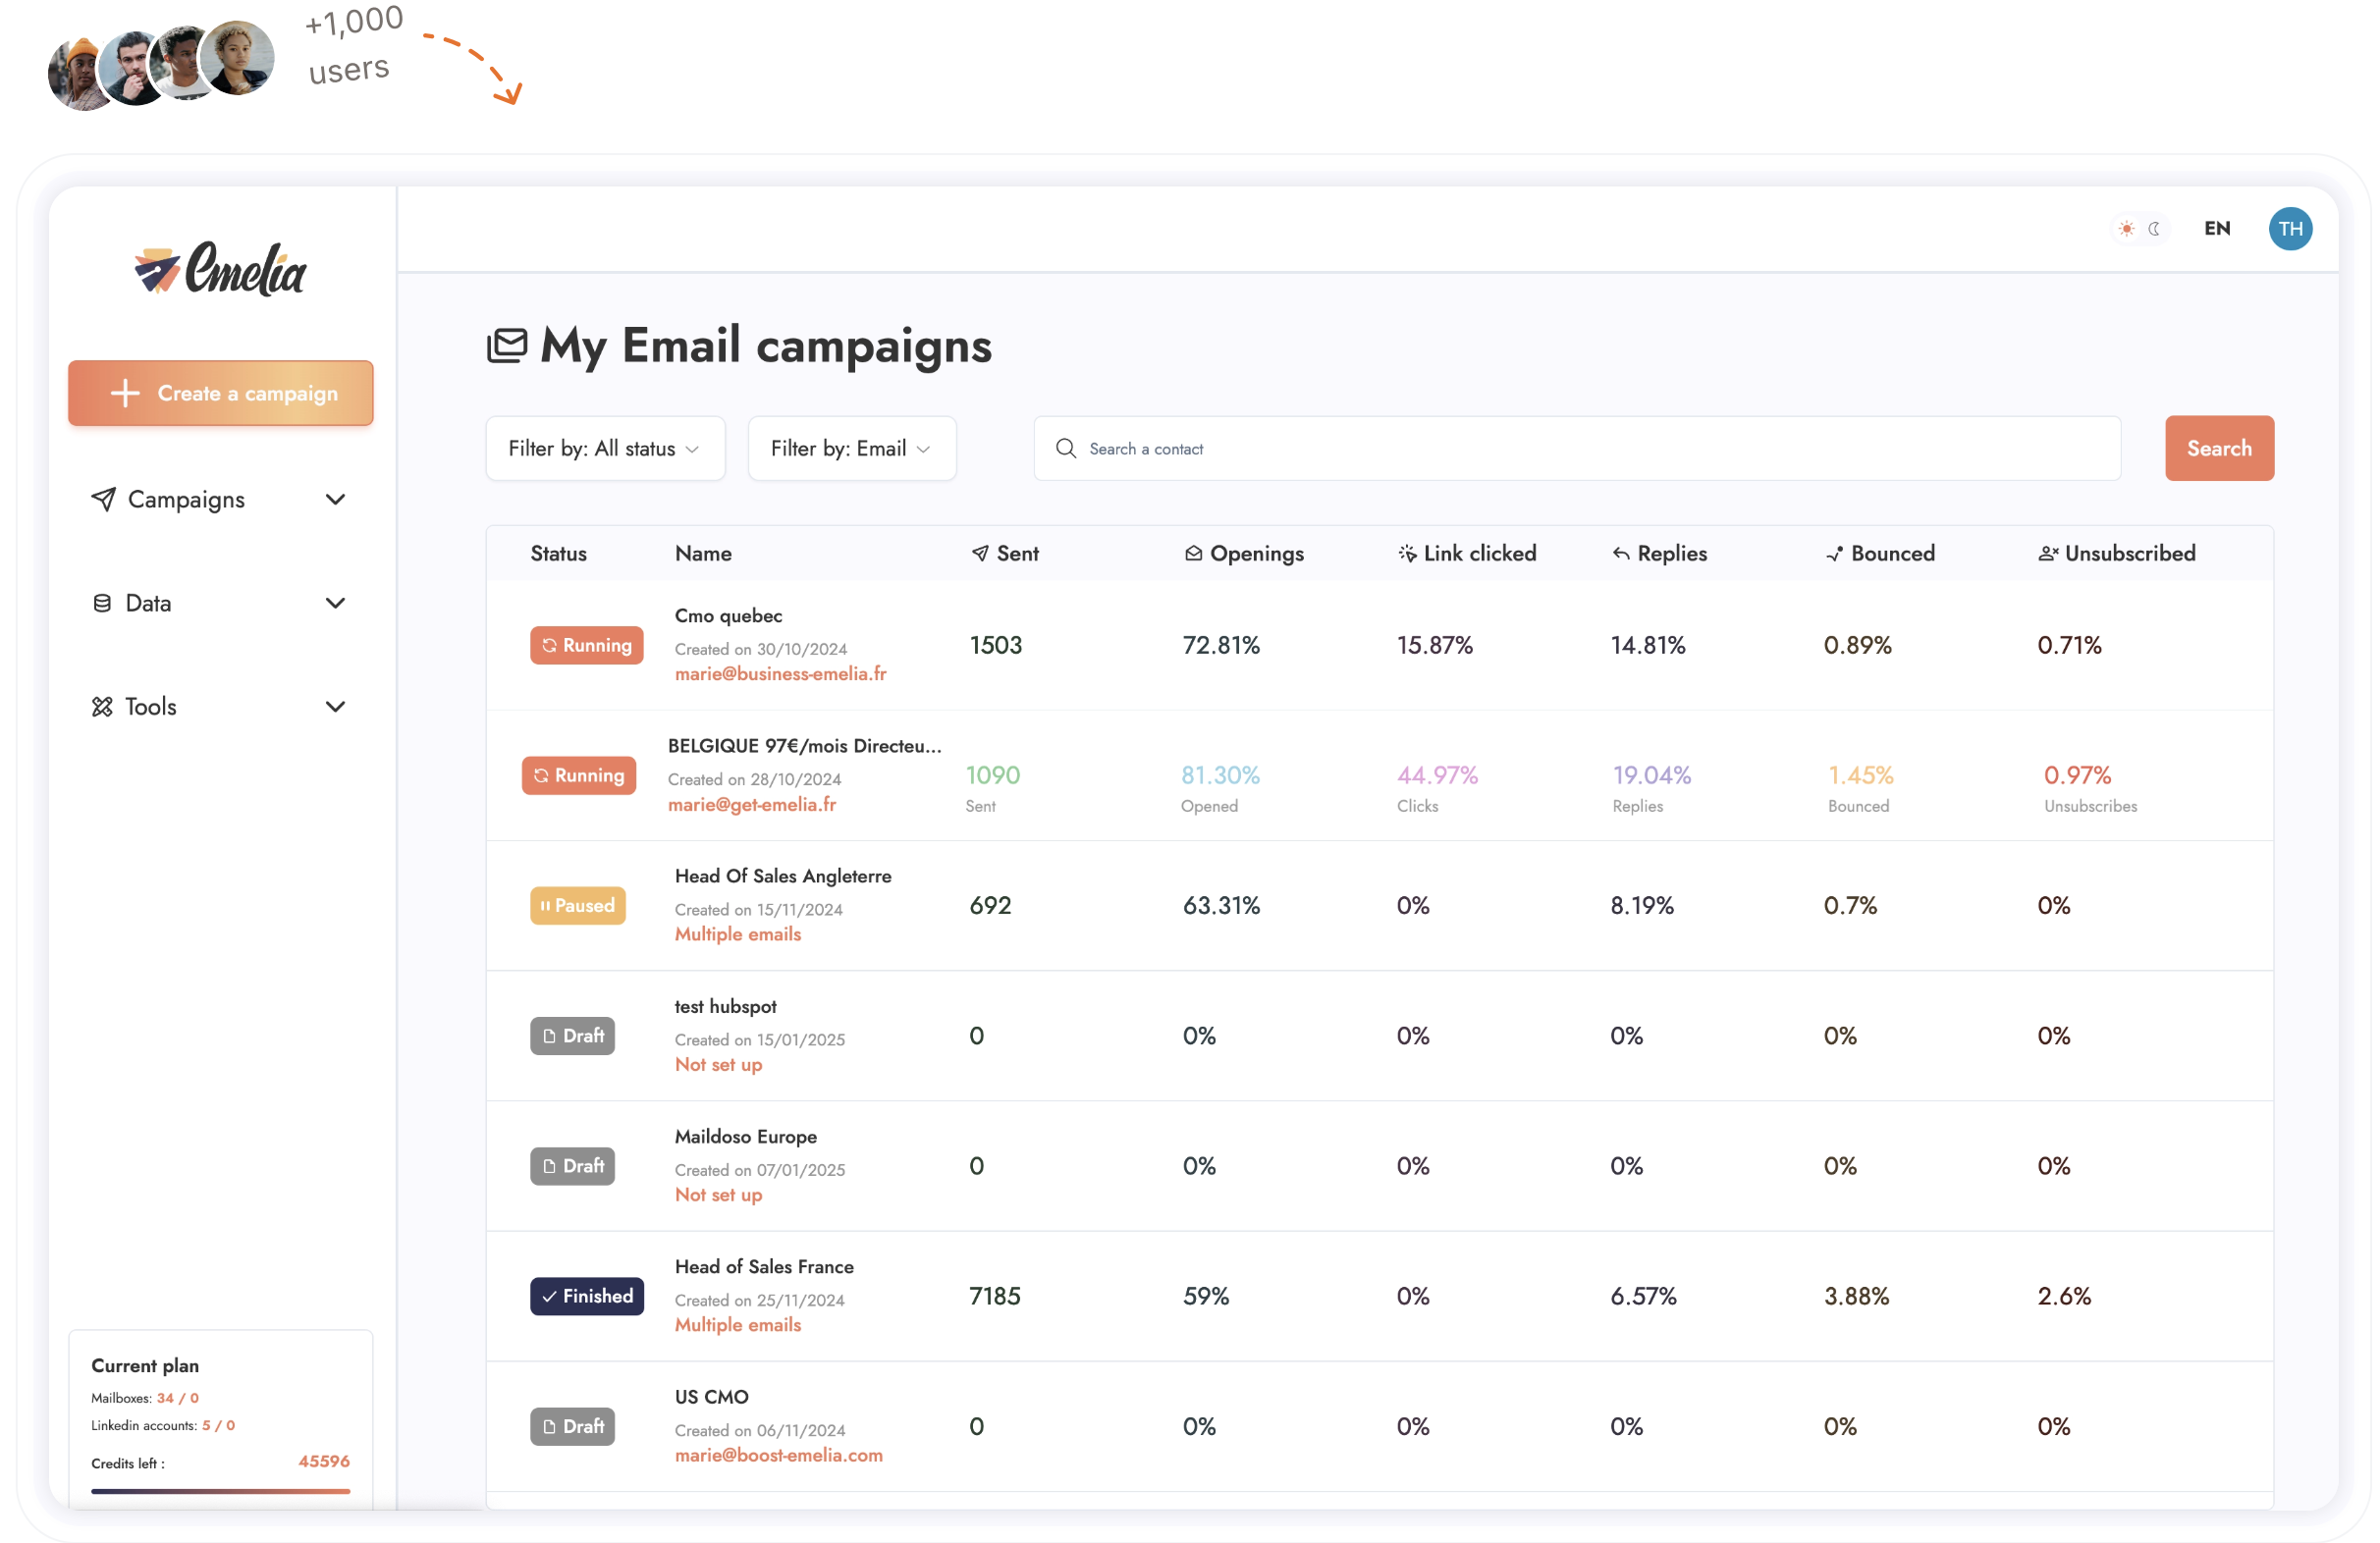
On the main page you will find all your current campaigns but also your campaigns in draft. For each campaign, you will have a statistical overview mentioning: the number of mails sent, the rate of unique openings, the number of opened mails, the rate of clicked links, the rate of response, the rate of bounced mails and the percentage of unsubscribes. To access a campaign, simply click on it.

The campaign
Once on one of the campaigns, you will see that all the parameters you need are directly on the campaign. No need to go on an adventure to find the different parameters you need to set, everything is done directly on the campaign page. Easy, isn't it? So you will have access to 4 tabs: The general parameters The sending email(s) Import of contacts Your mail sequence
To access one of these tabs, simply click on it: a window will open and you will be able to set up your cold-mailing campaign.
General settings
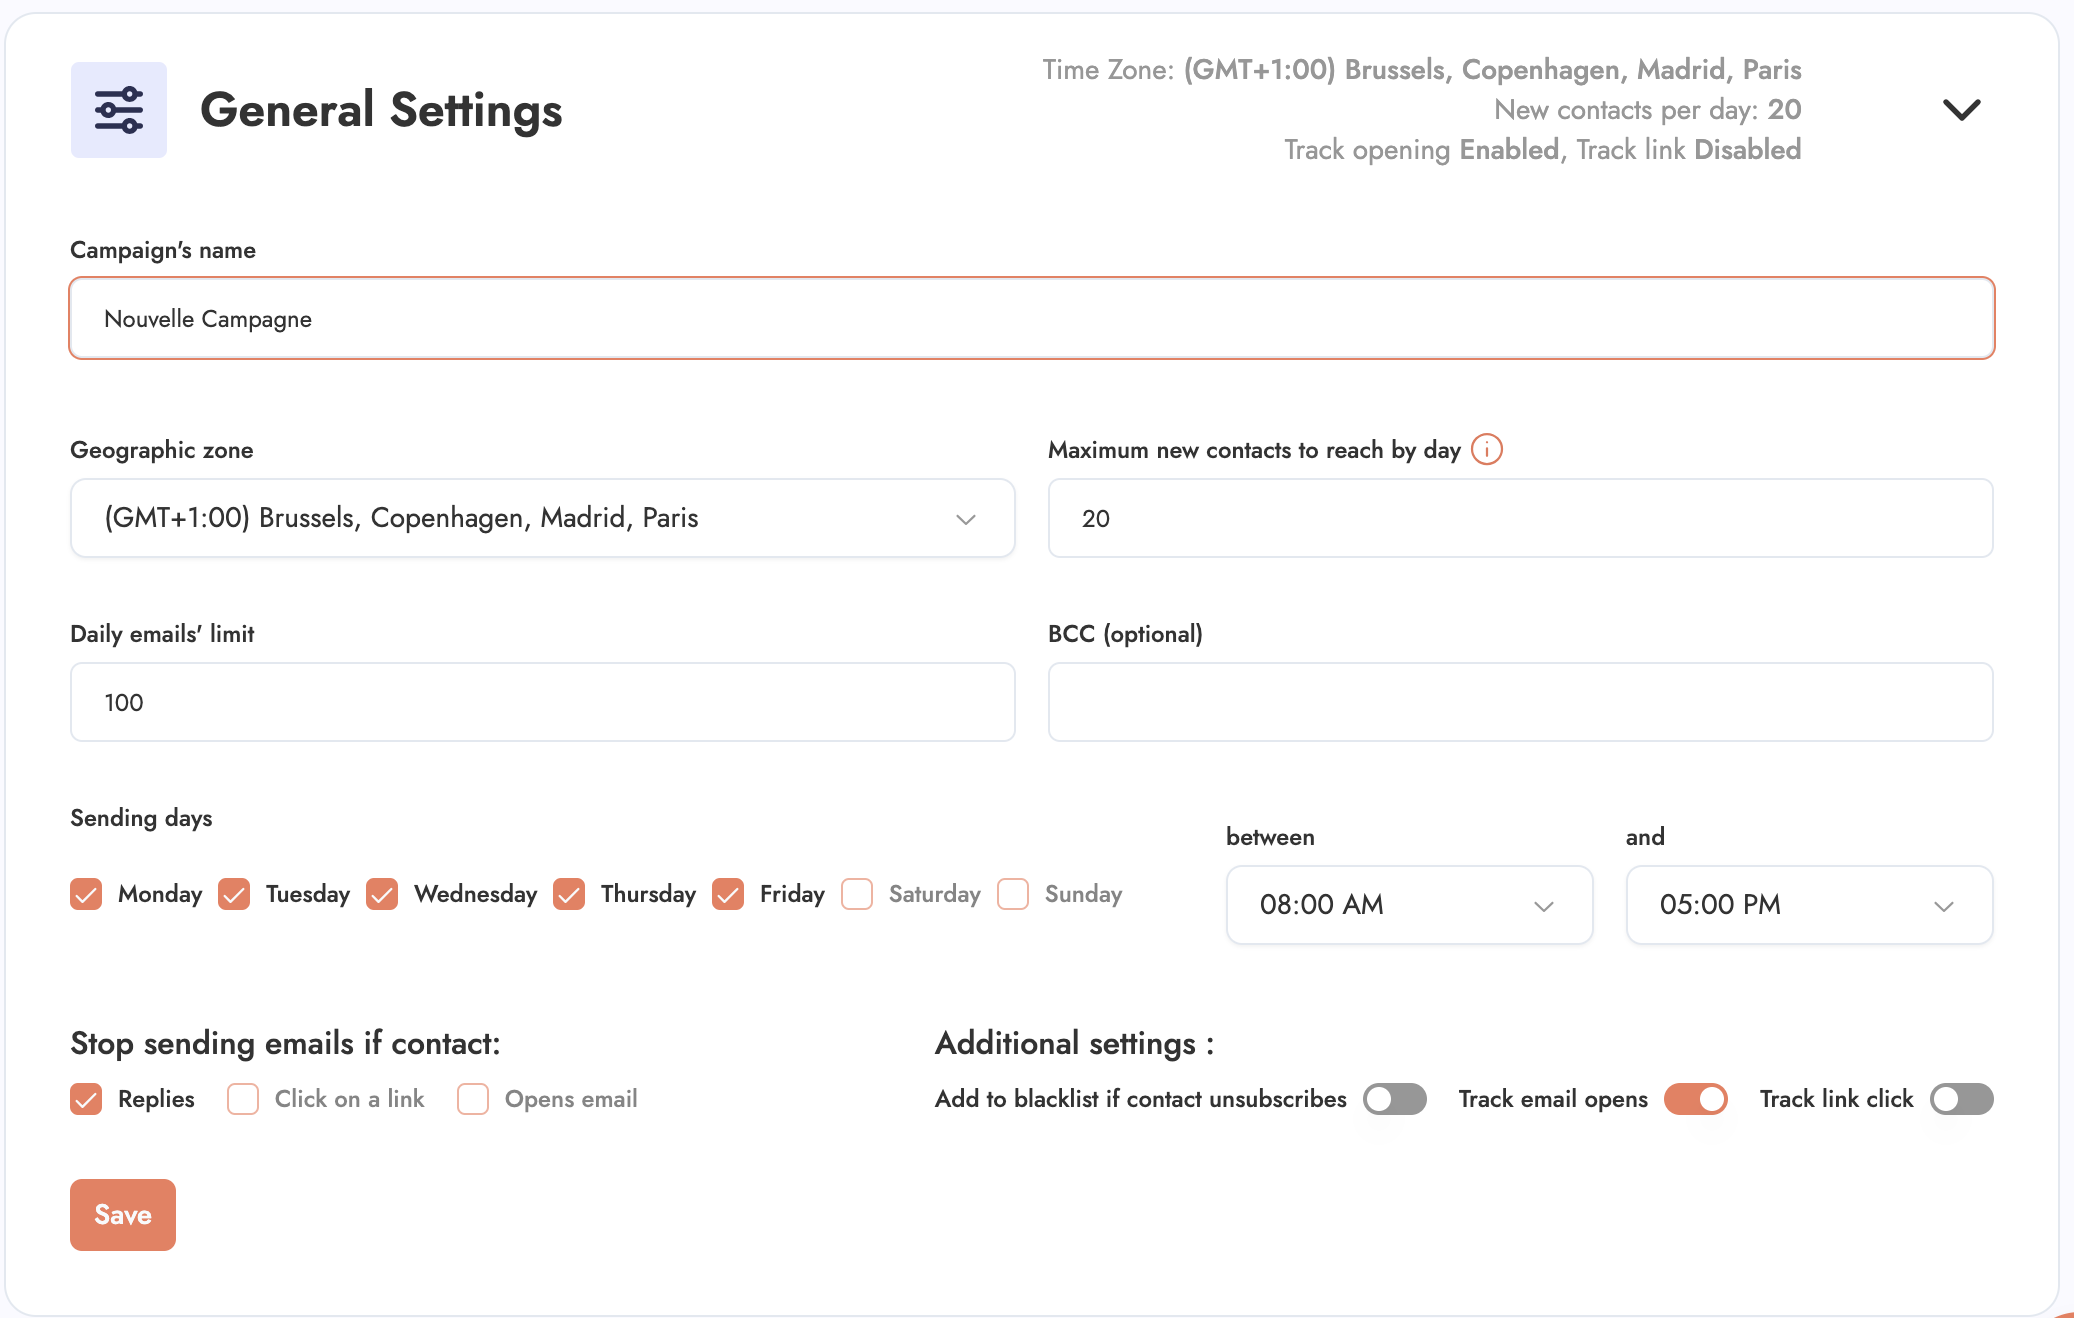
As its name indicates, in this tab you will configure everything that concerns the general parameters such as the name of the campaign, the geographical area and the days/times of sending. But also the maximum number of people to reach per day and the daily sending limit.
let's take an example to understand the difference between those two:
If you have a listing of 1000 contacts and your sequence consists of 3 emails, each separated by 3 days, if you put 50 in "Maximum new contacts to reach by day" then when you launch your sequence we will send the first day 50 emails to the first 50 contacts, but 3 days later you will send 100 emails, since 50 new step 1 and at the same time 50 step 2 to the people to whom you sent step 1 a few days earlier. In the end, with step 3, there will be times when you will send 150 emails per day.
So the goal is not to start too high so that when all the emails accumulate you don't exceed a certain limit.
If you have 10 steps but only 100 contacts then they won't overlap, that's fine, or one step but 10,000 contacts. But if you have 10 steps and 10,000 contacts then you really need to start at 10 contact days.
So even if you have the "Daily sending limit" setting which allows you to set a maximum limit for safety, it is better to think beforehand and start with a figure that is consistent with your campaign so that you don't have this limit which blocks the programming and which will therefore delay messages and shift the sequence.

As you can see, we do everything to work in an optimal way. The technicality coupled with the ease of use is what makes Emelia the simplest and most powerful cold-mailing software.
You can also find a feature "Don't send emails anymore if the user:" - Answers - Clicks on a link - Opens the email
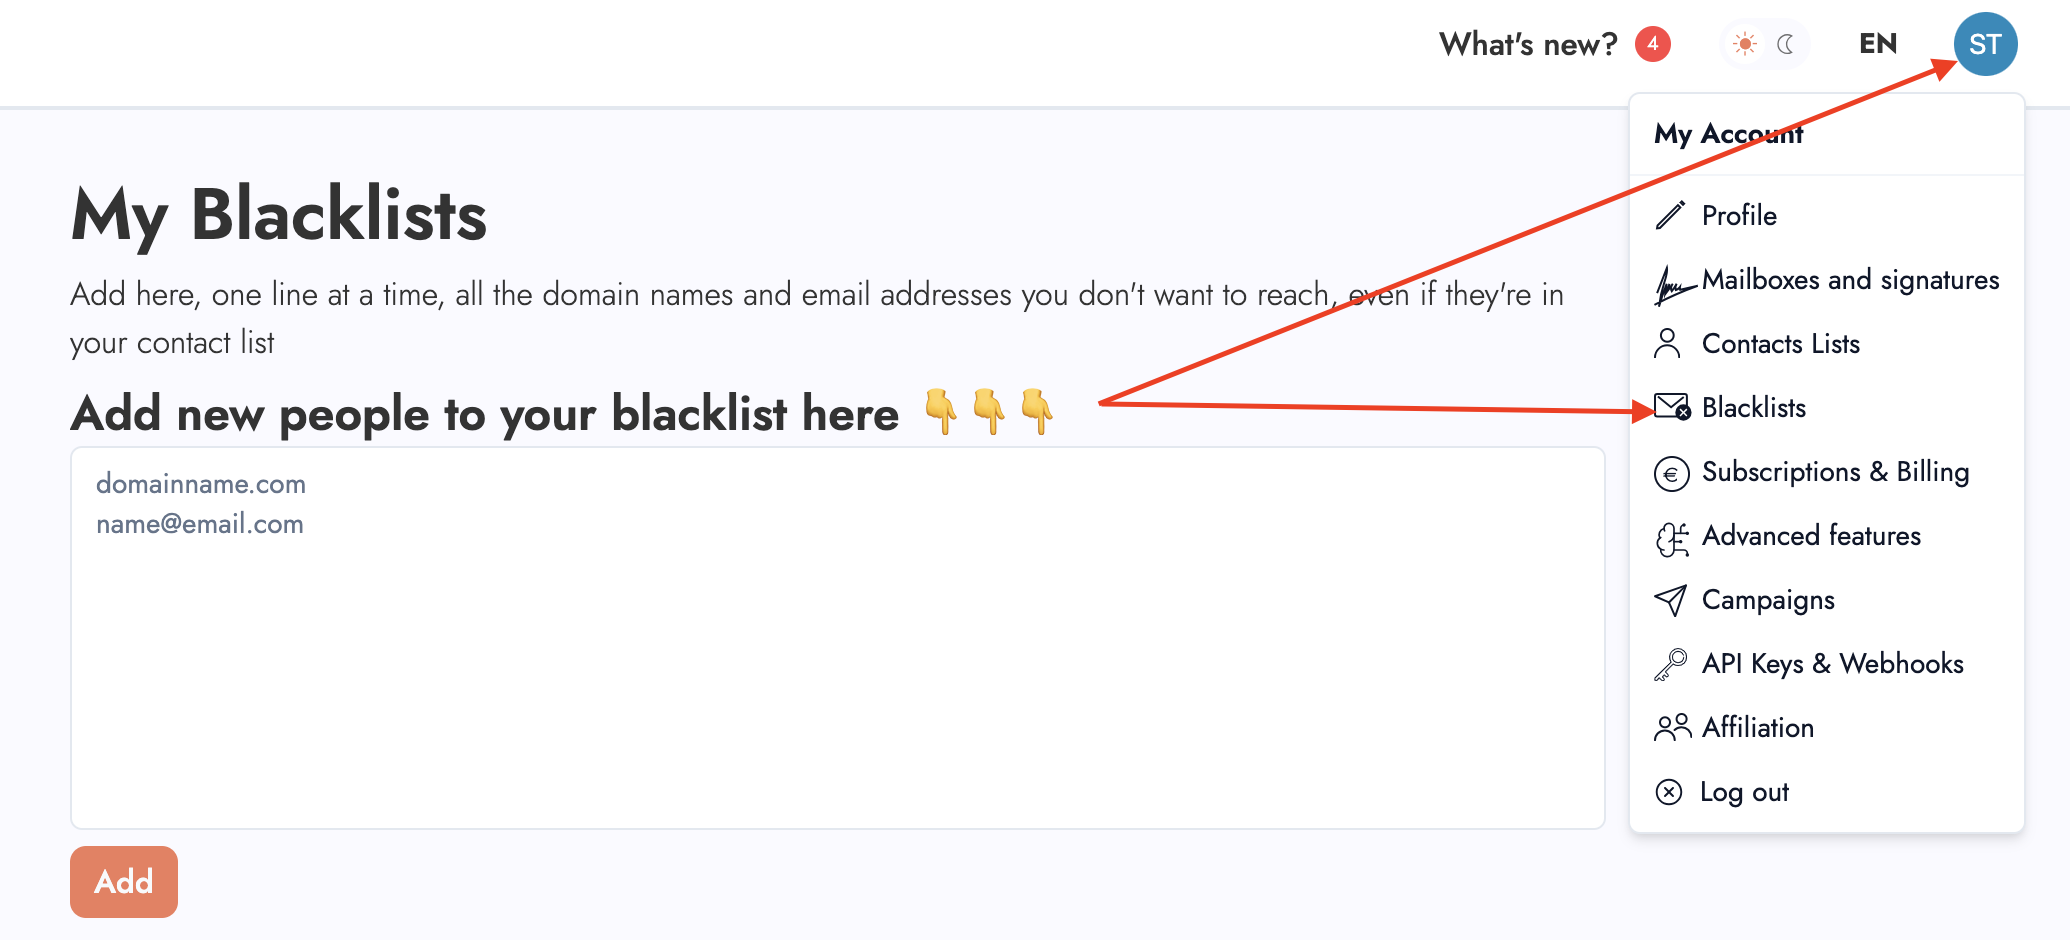
Finally, you will be able to add the "Add to blacklist if UNSUBSCRIBED" feature.

This addition only makes sense if you have an unsubscribe link in your signature. It is also important to know that when someone unsubscribes, he/she ONLY unsubscribes from the current sequence. Whereas blacklisting will not send any more emails to that contact. So the use of this feature depends on your status, if you are an agency that does email campaigns for several companies, then you should not check this box. Since it is possible that a prospect unsubscribes from a campaign of a client without you wanting him to unsubscribe from a campaign of another client.
On the other hand, if you are only prospecting for yourself, then yes, in this case you should check this functionality if you are doing mass mailing. If on the other hand you are doing "personalized" emails, you can even do without the unsubscribe button.
Sender
On this tab you can connect your GSUITE mails, a gmail account, an office 360 account or an SMTP/IMAP account. Regarding the procedure to connect your Google Gsuite/Workspace account, we have a small article that you can find here that details the procedure.
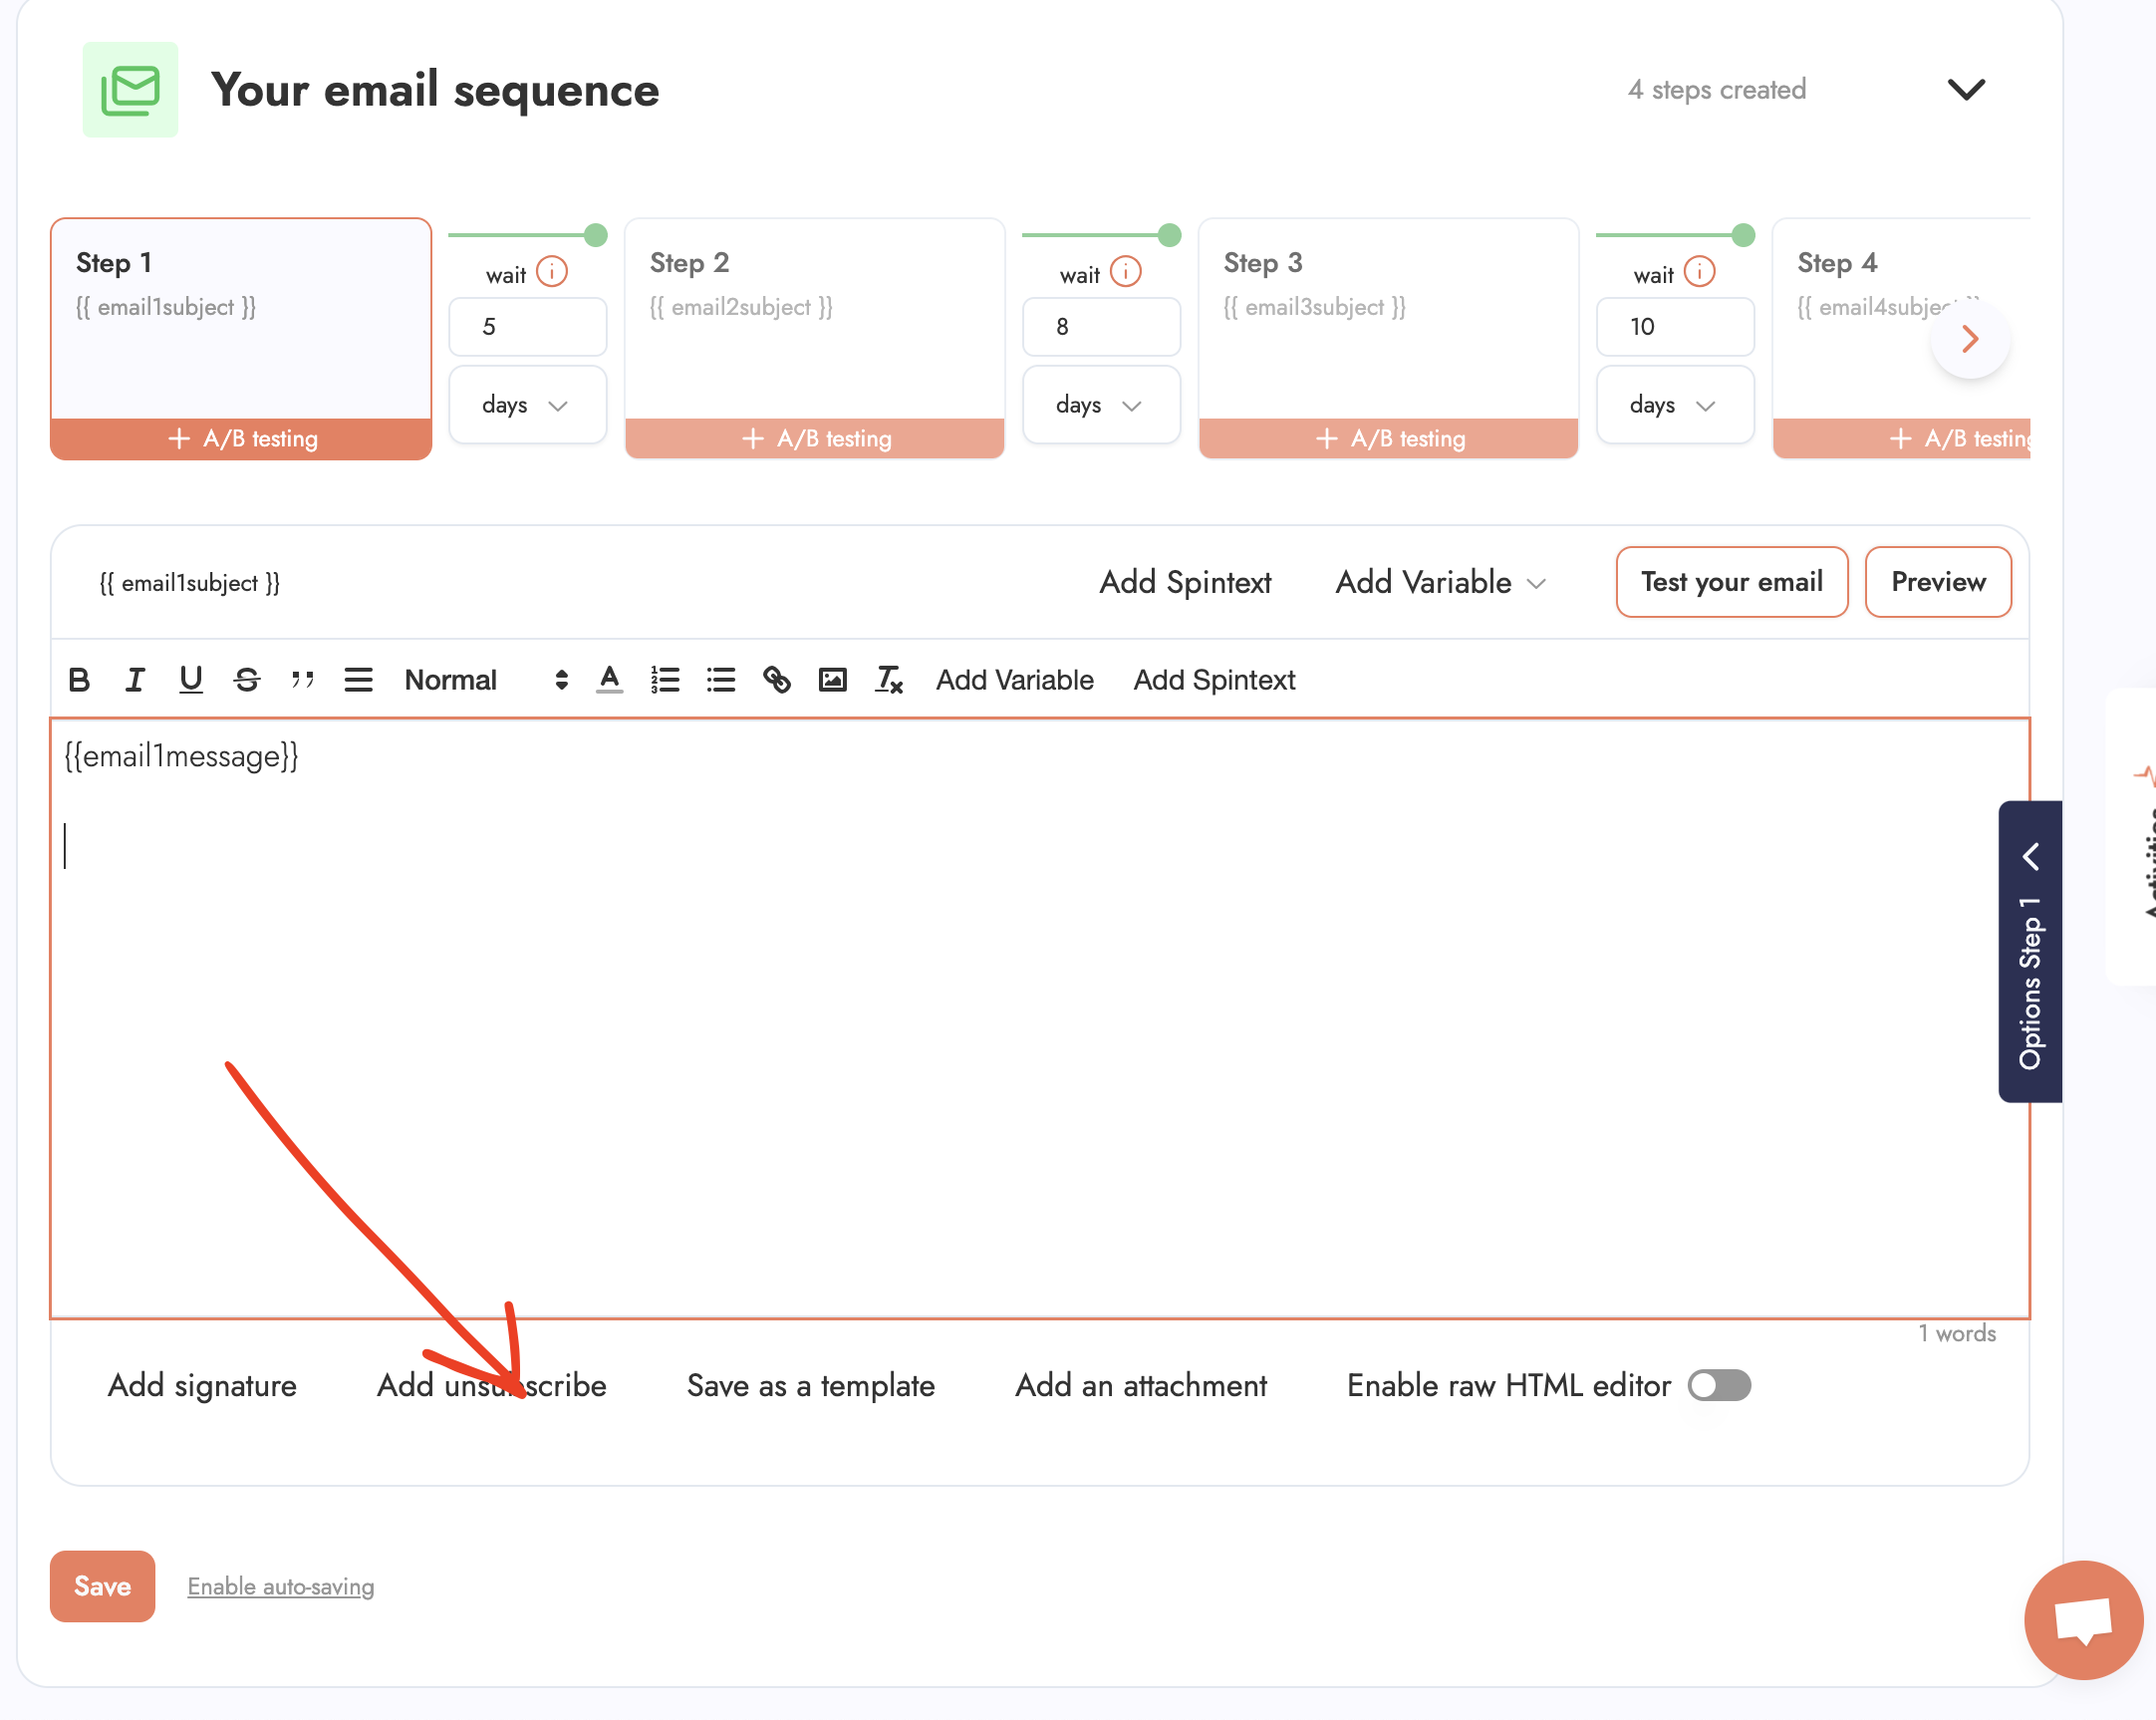
Once your account is added, you can set up your signature and it is in this signature that you must add your unsubscribe link. Just click on "add an unsubscribe link" and modify the content as you wish.

Import your contacts
To import contacts, nothing could be easier. In "Add contacts", select your CSV file, then give a name to your list. The software will normally detect the different classes, if you have additional variables, you just have to put them in "custom".
You also have a small "filters" button where you can delete contacts that have already been marked as "bounce" on Emelia. We have databases of emails and in these databases there are emails that are not assigned, the option delete bounced emails allows you to not send them unnecessary emails.
You will also have the possibility to delete contacts already present in other campaigns. And the possibility to delete contacts in the blacklist.
In your contact list, Emelia will automatically give a "Status" to each of the sent emails. For example "sent", "answered", "opened", "bounced", "clicked", "unsubscribed" or "interested".
Please note that if a prospect calls or answers you with another address, we will not be able to detect it. You will therefore have to manually modify the status to be able to follow the progress of your campaign.
Your email sequence
In your blank email sequence, you will only have one step to fill in. First the subject of the email, then its content. You can of course add variables, you will have to click on "add a variable" and select the one you want, for example firstName if you want to personalize the email with the first name of each prospect, you can also add variables in the subject of the email. Don't forget the signature variable at the end if it's an important email.

You also have the possibility to add spintext to be less repaired by the detection algorithms of Google & co. By clicking on "spintext", you can for example create an alternation between the word "bonjour", the word "salut" and the word "hello".
Don't forget to click on "Save" so you don't lose your work.
Once you have finished your Step 1, you can add more steps to the reminder, the process remains the same. It goes without saying that at Emelia we let you create as many steps as you want, at no extra cost.
You will be able to set intervals between each step from one minute to several days, passing by a few hours, everything will depend on your needs and your imagination. It is also possible to send the emails of the different steps via different addresses. For example, if you want to send the first email via your classic prospecting address, then the second directly via the email of a team member, this is possible.
A/B testing is of course available.
A raw HTML editor is also available for those who wish to present their mails differently. To send attachments, you just have to click on "Add an attachment".
On the right side of the interface, you will find a "Step 1 Options" button where you will have different settings that you can try as you wish. One important option that should be highlighted is the display of the history of previous emails.
This feature is checked as standard but you can uncheck it if you want each email to be independent. The choice of the sending email we mentioned earlier is also available in this tab.
Conclusion
That's all it took to launch your first cold mailing campaign on Emelia, we have done everything to make it as easy and intuitive as possible.
Once your campaign is launched, you will have access to all the statistics that we will provide you to measure your success. We hope you like our software and we wish you a good mailing!

Clear, transparent prices without hidden fees
No commitment, prices to help you increase your prospecting.
Credits(optional)
You don't need credits if you just want to send emails or do actions on LinkedIn
May use it for :
Find Emails
AI Action
Phone Finder
Verify Emails
€19per month
1,000
5,000
10,000
50,000
100,000
1,000 Emails found
1,000 AI Actions
20 Number
4,000 Verify
€19per month
Discover other articles that might interest you !
See all articlesBlog
Published on Apr 3, 2025
5 B2B Sales Tools To Skyrocket Your Sales in 2025
 Niels Co-founder
Read more
Software
Published on Nov 25, 2025
5 Billing Software Tools That'll Actually Make Your Life Easier (Without the Hype)
 Niels Co-founder
Read more
Blog
Published on Jul 24, 2024
Boolean Search, LinkedIn Sales Navigator's Secret Weapon
 Marie Head Of Sales
Read more
Tips and training
Published on Dec 5, 2022
Few things to avoid in your campaigns
 Niels Co-founder
Read more
B2B Prospecting
Published on Dec 2, 2022
Use the multi-sender (email rotating) functionality
 Niels Co-founder
Read more
Software
Published on Nov 23, 2025
5 Data Visualization Tools That'll Make Your Data Actually Look Good (2025 Guide)
 Niels Co-founder
Read more
Made with ❤ for Growth Marketers by Growth Marketers
Copyright © 2026 Emelia All Rights Reserved
