Create a LinkedIn outreach campaign
You can be up and running immediately, with no domain and no warm-up. But the limits are far tighter than in email, and there is an acceptance condition you need to understand before you build the sequence.
What you need before you start
Two things only, and that is what makes LinkedIn so fast to get going: a LinkedIn account connected to Emelia, and profiles to contact, meaning a list that carries each prospect's LinkedIn URL.
Step 1: create the campaign
In the left-hand menu, open Campaigns, then click New campaign at the top right. Give the campaign a name: your prospects never see it.
 12
12- 1Open Campaigns in the left-hand menu.
- 2Click New campaign.
Step 2: start from a template or from scratch
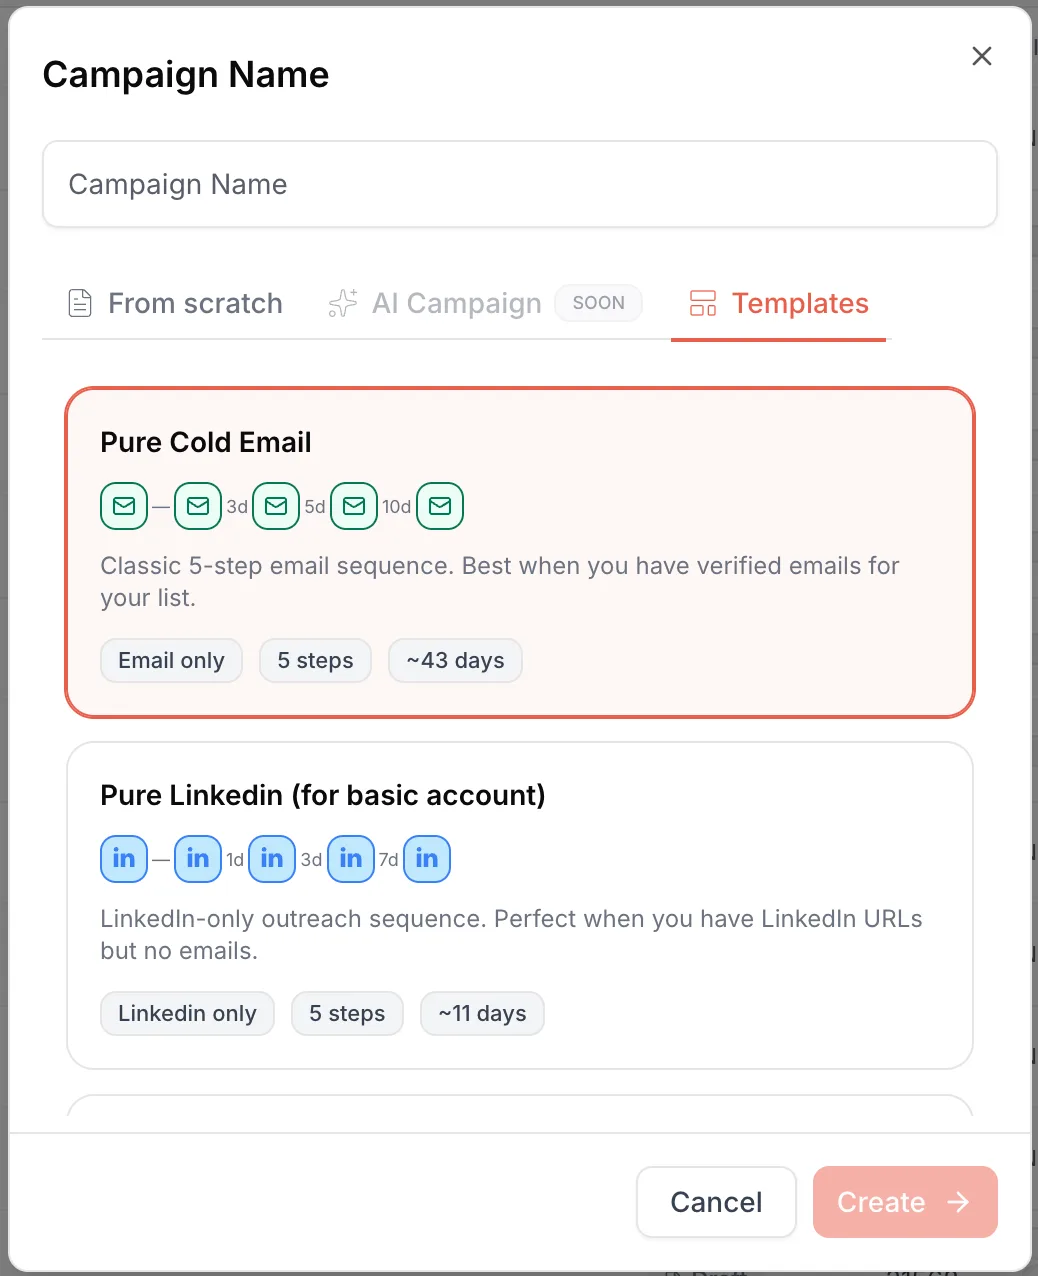
Two LinkedIn templates are waiting in the Templates tab. They contain no copy, only the structure and the delays:
Pure Linkedin (for basic account): a connection request without a note, a first message one day after acceptance, a second one three days later, a like on the latest post seven days after that, then a last message right after. No conditions.
Pure Linkedin (for Premium Account): a connection request, then the acceptance condition with a five-day wait. If accepted, three messages. If not, an InMail, a like and a message. The difference comes down to InMail: only a paid subscription lets you write to someone who has not accepted your request. In practice, most people with Premium actually have Sales Navigator, which they took to pull prospect lists.
If you are starting out and hesitating, take a template: the structure is already right. For the rest of this page we start from scratch, because building it yourself is how you understand what each piece is for.
 1234
1234- 1Templates tab.
- 2Pure Linkedin (for basic account). The Premium template sits just below.
- 3Or From scratch.
- 4Create.
Step 3: switch the panel to LinkedIn mode
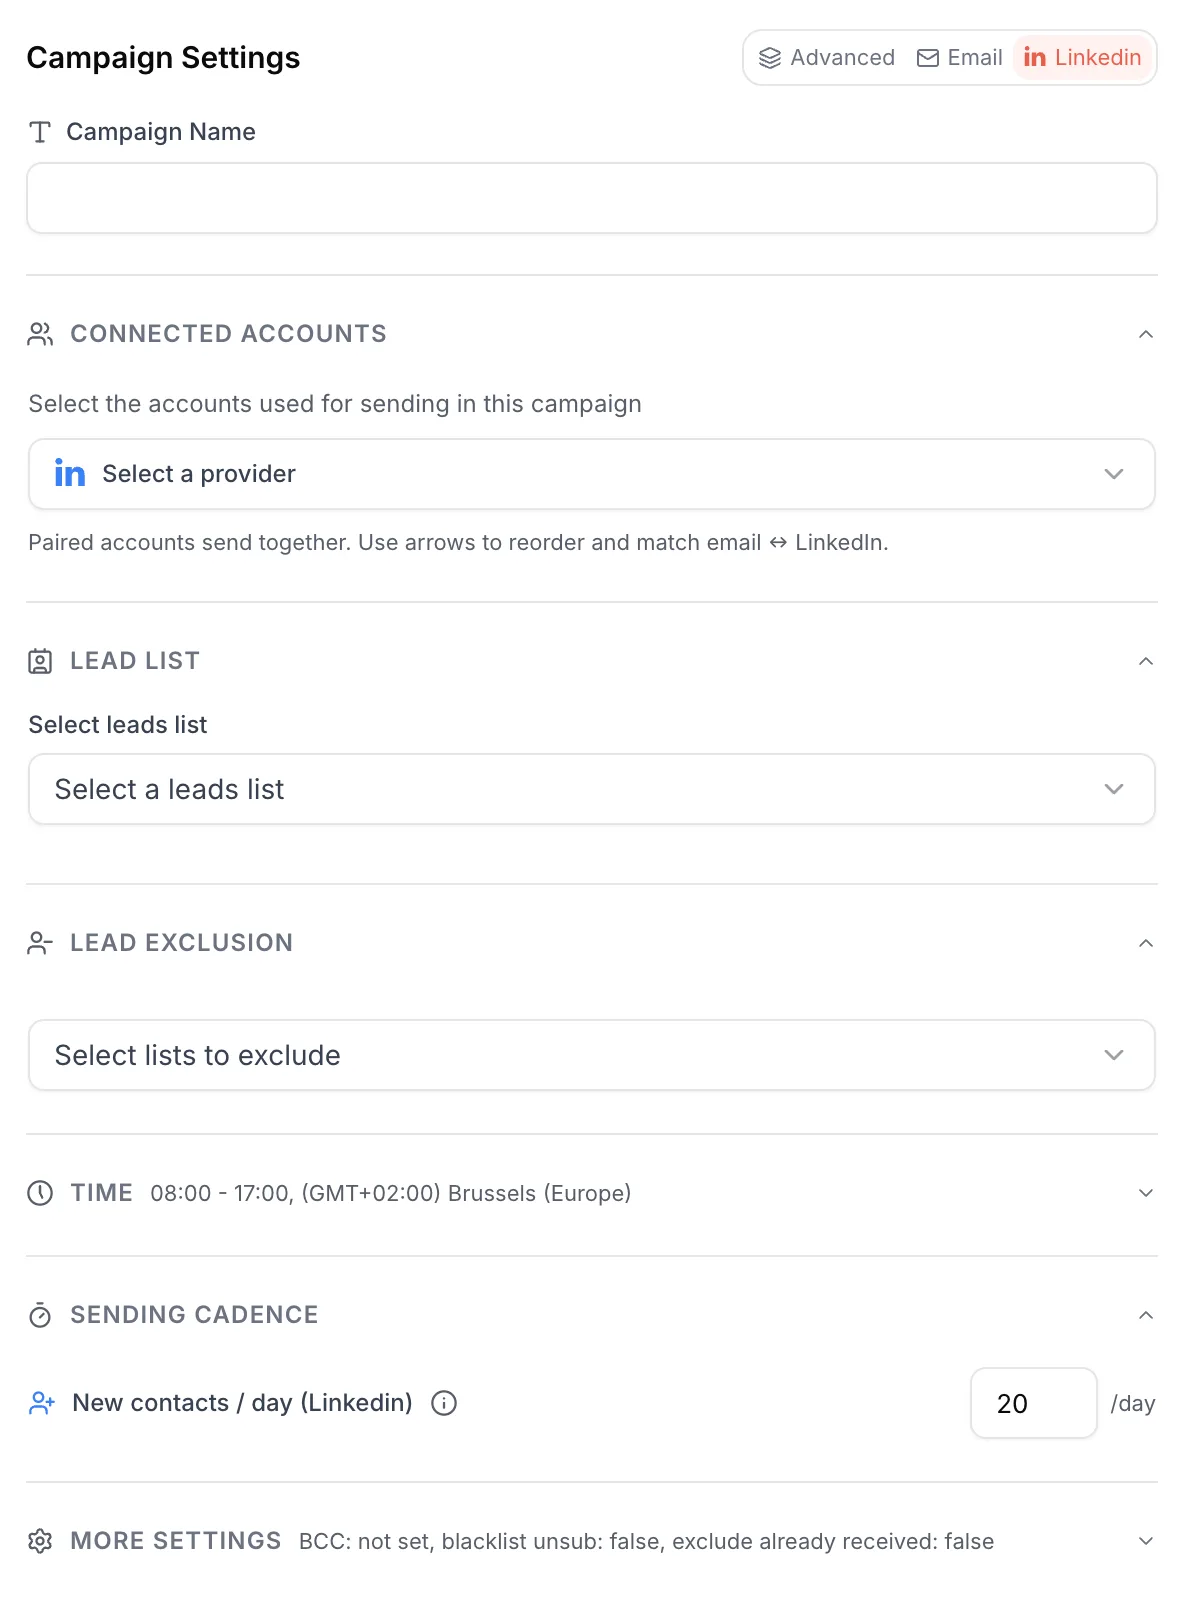
The builder opens, with the Campaign Settings panel on the right and its three tabs: Advanced, Email and Linkedin. If you are only doing LinkedIn, click Linkedin.
The panel then keeps only what concerns you: the LinkedIn account, the list, exclusions, sending hours, the LinkedIn limit and the useful options. Email-only blocks, such as open tracking, disappear. And the effect goes beyond the panel: the add-step menu only offers LinkedIn steps and conditions.
This filter deletes nothing and is not saved: the next time you open the campaign, the panel is back on Advanced.
 1
1- 1Click Linkedin: only the LinkedIn settings remain.
Step 4: select your LinkedIn account
Under Connected accounts, click Select a provider and choose the account that will run the campaign. If you have not connected one yet, now is the time: the method depends on who owns the account.
You can also select several, your sales reps' accounts for example: contacts are then split between the accounts, and each contact keeps theirs from start to finish. But you do not buy volume by multiplying profiles. You earn it by respecting the limits of a real account, with a history and a network.
1- 1Select a provider: choose one or more LinkedIn accounts.
Step 5: choose your contact list
Under Lead list, select a list you already imported, or create one. The source depends on what you have available.
With Sales Navigator, you get the sharpest targeting on the market and you pull the profiles that match your criteria directly. Without Sales Navigator, the regular LinkedIn search does the job, with less precise filters. If your target market is France, a B2B database gives you executives along with their LinkedIn profile. If you already have a file, import it, as long as it carries the LinkedIn profile URLs: without them, no LinkedIn action is possible.
Just below, Lead exclusion removes from the campaign any contact who also appears in other lists, matched by LinkedIn URL or email: customers, prospects already contacted, a colleague's contacts.
12- 1Lead list: the list to contact.
- 2Lead exclusion: the lists not to contact.
They leave the campaign at the connection request step. And if no contact in the list has a profile URL, the launch is refused: check the column mapping of your file.
Step 6: sending days and hours
The Time block works as it does for email: a time zone, active days and a sending window, Monday to Friday from 8 a.m. to 5 p.m. by default. In a campaign that mixes both channels, email and LinkedIn share the same hours.
LinkedIn actions are spread across the whole window, one at a time per account, with several minutes between two actions. That pace is deliberate: it looks like a person, not a robot. Whatever does not fit into the day moves to the next sending day.
As in email, delays between steps are counted in sending days: with a Monday-to-Friday campaign, a three-day delay set on a Thursday leads to Tuesday.
1- 1Time: time zone, active days, start and end times.
A zero or one-minute delay between two LinkedIn steps will never be applied to the letter: the safety gaps between two actions come first. Think in hours or days.
Step 7: the action limit
In Sending cadence, New contacts / day (Linkedin) sets how many prospects enter the sequence each day. When the sequence starts with a connection request, that is in practice the number of new connection requests per day. It applies per LinkedIn account connected to the campaign.
Without a Premium account, keep 20, the default value. Above that, the panel reminds you that 20 to 40 requests a day are for Premium accounts only.
With Premium or Sales Navigator you can go up to 40. Set 35 instead. Keeping five in reserve lets you send requests by hand without competing with your own campaign. With a connection request in the sequence, Emelia refuses any value above 40 anyway.
That number only counts new entries. Messages from previous days pile on top, and the daily total climbs on its own. You do not have to work that out: Emelia spreads the actions and never schedules more than 40 connection requests, messages and InMails a day on the same account within a campaign. Anything beyond moves to the next day.
1- 1New contacts / day (Linkedin): 20 without Premium, 35 with it.
The limit is counted campaign by campaign: two campaigns set to 20 on the same LinkedIn account can send 40 connection requests a day. If you run several campaigns on one account, split it yourself: the sum of their settings must stay within your account's limits.
A sequence aimed only at people already in your network, so with no connection request: the setting then accepts up to 80. But since Emelia never schedules more than 40 requests, messages and InMails a day on an account within a campaign, going above 40 gains you nothing.
Step 8: the LinkedIn options
Last block, More settings. The option that matters here: Don't send messages to prospects the account has already had a conversation with (LinkedIn), unticked by default.
When ticked, it sets a prospect aside at the moment a message is about to go out if your account itself wrote to them before the campaign was first launched, including outside Emelia. It only works for that account: a colleague contacting the same list from their own account is not covered. And a prospect who wrote to you without ever getting a reply is not set aside.
You will not see a Condition to stop block in LinkedIn mode, and that is normal: a reply on LinkedIn always stops the prospect's sequence, whatever your settings.
1- 1More settings: the “already had a conversation” option.
If you go back to contacts you already approached, or duplicate a campaign that had it ticked, this option can set aside a large share of your prospects: their messages do not go out. Untick it in that case.
Step 9: the connection request
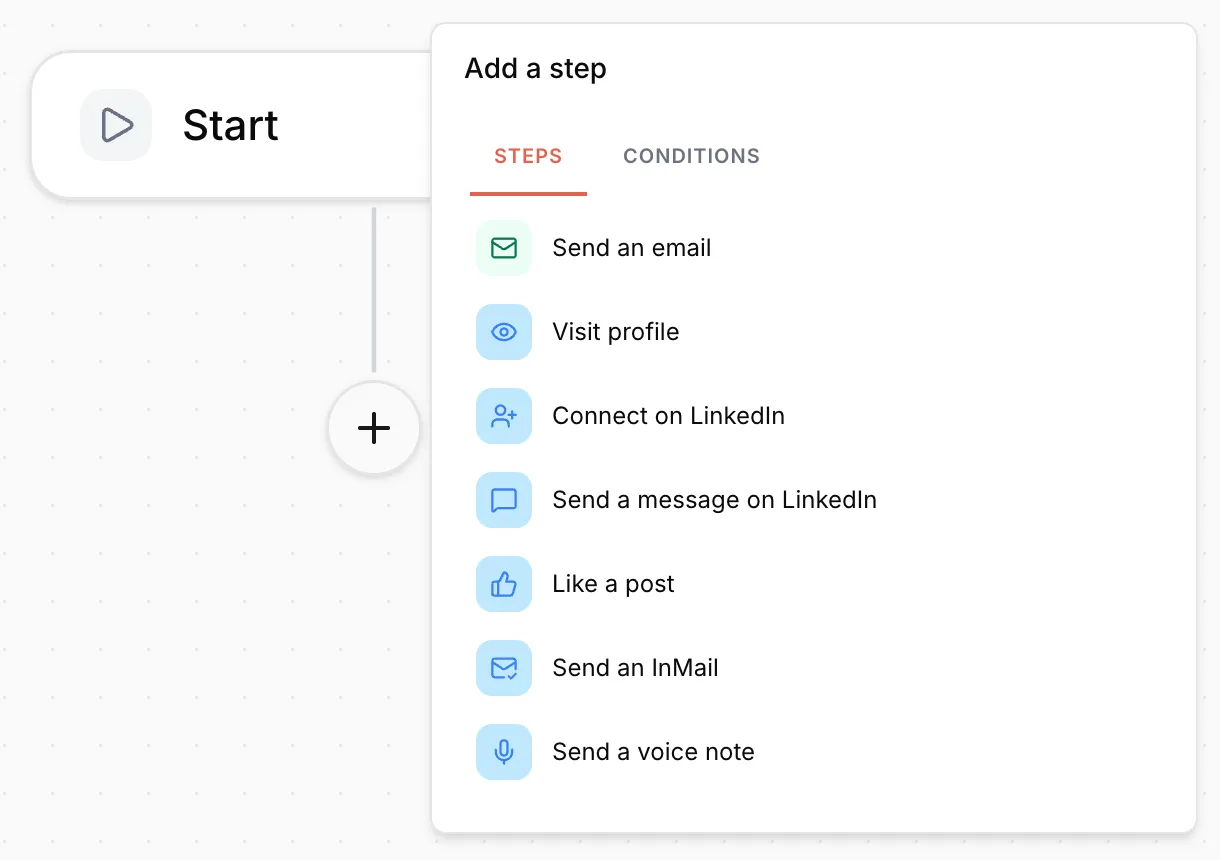
On the canvas, click the + below Start. The first step is almost always the same: Connect on LinkedIn. It is what opens the door, since without an accepted connection you cannot send an ordinary message.
 12
12- 1Click the +.
- 2Connect on LinkedIn: the connection request.
There is only one type of connection step, but opening it lets you add a note. That choice deserves thirty seconds of thought.
If you do not have Premium, skip the note. LinkedIn caps connection requests with a note very harshly on free accounts, at a handful per month. You would burn through your allowance in two days for nothing.
Does the note win you anything? Not in any obvious way, and the truth is more interesting than that. What you tend to see is a better acceptance rate without a note: a bare request asks for nothing and gets accepted on autopilot. With a note, the prospect sees what you want, so some of them decline. But the ones who accept know why they accepted, and they reply more afterwards. You are trading connection volume against conversation quality.
A prospect who is already in your network gets no request: the step is skipped, they count as accepted, and the sequence moves on.
The limit shown is 200 characters, and you regularly see notes written right up to 198. Except there is a variable in there. The editor cannot guess what “Dupont-Lachaume” or “Compagnie Générale des Établissements” will weigh at send time, so it does not count it. Stay at 130 or 150 characters: whatever name gets inserted, you stay under.
Should you visit the profile or like a post before inviting?
Some people add a profile visit or a like on the latest post a day or two before the connection request, to get noticed first. It is a widespread practice, and the question deserves an honest answer: does it really change anything?
The opposite argument holds up at least as well. These gestures cost actions on an account whose limits are already tight, and they may be better placed inside the sequence, once the request has gone out, when the person has not accepted or not replied. There, they revive attention rather than create it.
Do what feels right to you. Good to know: if the prospect has never posted, the Like a post step blocks nothing, the sequence carries on.
Step 10: the acceptance condition
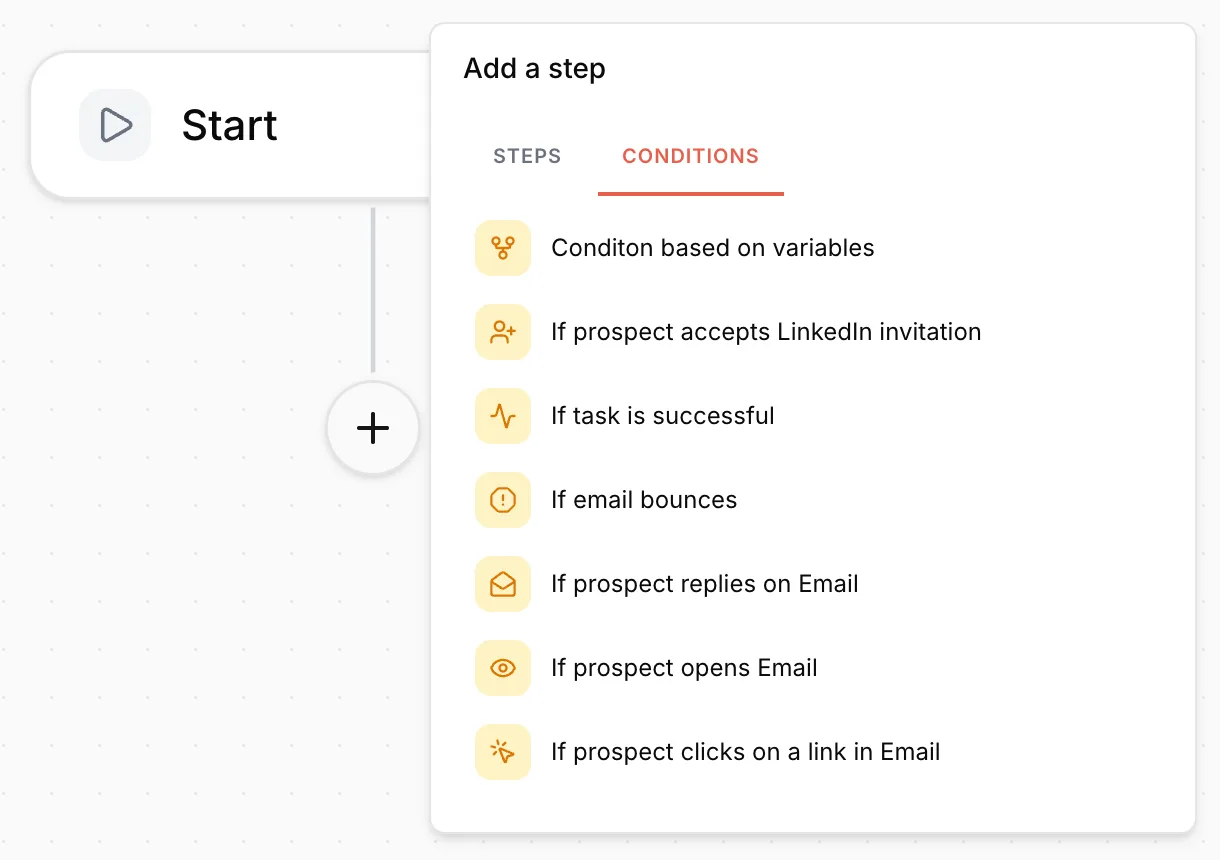
Click the + again below the connection request: Emelia suggests the If prospect accepts LinkedIn invitation condition. You also find it in the Conditions tab of the menu. Place it directly below the Connect on LinkedIn step, with nothing in between: it watches that specific request.
The condition creates two branches, Accepted and Not accepted, and one setting in the right-hand panel: the Maximum wait time, in minutes, hours or days. Under the field, one sentence sums up the rule: “After this waiting period, if nothing has happened, it is considered invalid.”
 12
12- 1Conditions tab.
- 2If prospect accepts LinkedIn invitation.
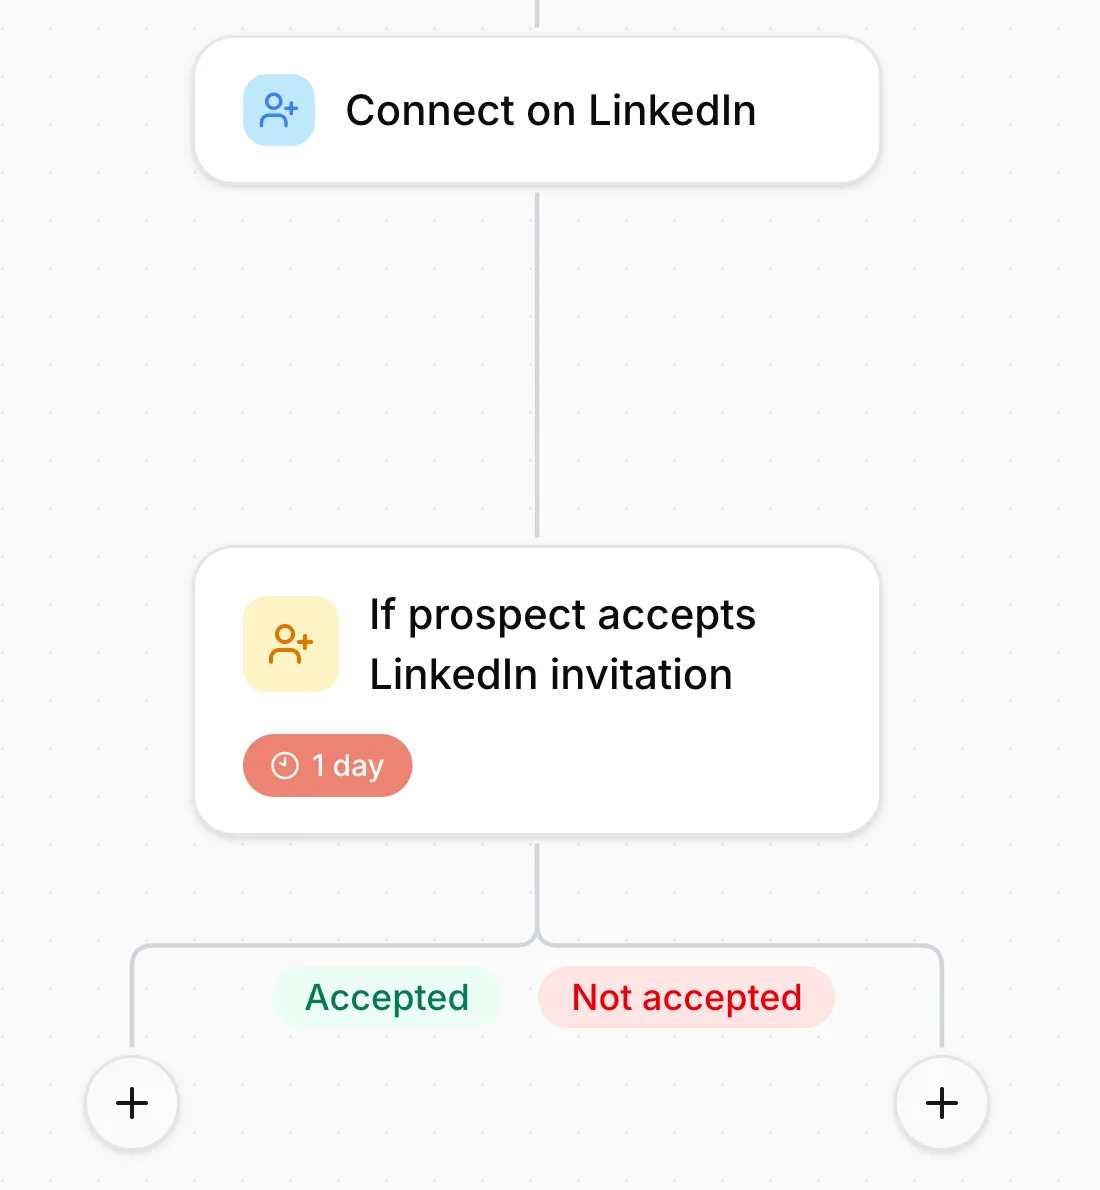 12345
12345- 1The Connect on LinkedIn step.
- 2The condition, placed right below it.
- 3The wait time: 1 day by default, change it to 5.
- 4Accepted branch.
- 5Not accepted branch.
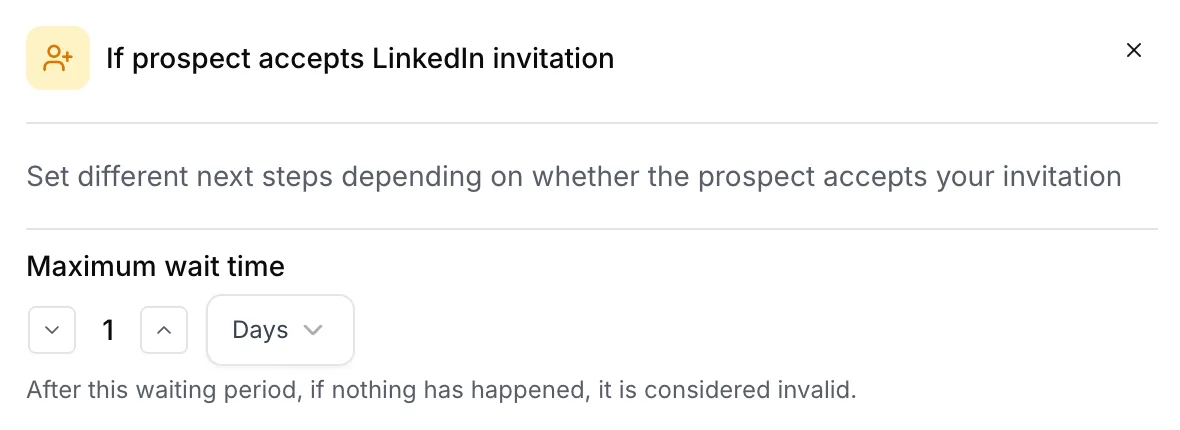 12
12- 1Maximum wait time: the number and the unit.
- 2Past that point, the condition counts as not met.
How the condition decides
The wait time is not a pause before the next step: it is the point after which the person is considered never to accept. It starts when the request is sent.
If the acceptance is detected before the wait ends, the prospect moves into the Accepted branch without waiting for the five days. The delay of the next step is counted from when the request was sent: with a one-hour delay on the first message, it goes out as soon as the acceptance is detected, within the sending window.
If nothing is detected by the end of the wait, the prospect goes down the Not accepted branch. And they never come back: if they accept the next day, they stay in that branch.
Two special cases count as an acceptance: a prospect already in your network, and a prospect who replies to you straight from the request.
That is deliberate, and it is a protection: polling LinkedIn constantly is exactly the kind of behavior that draws attention to an account. Emelia checks for new connections when the account performs other actions, and at least every two days. Expect anything from a few hours to about two days between the real acceptance and Emelia picking it up. It is the detection date that counts: with the default one-day wait, prospects who did accept end up in the Not accepted branch. Set five days.
What to put in each branch
Accepted branch: your LinkedIn messages, as in a simple sequence. Emelia even suggests Send a message on LinkedIn there.
Not accepted branch: another channel. If you have Sales Navigator or Premium, the InMail, the only message LinkedIn lets you send to someone you are not connected to. It uses an InMail credit from your subscription, not your ordinary message allowance, and its subject is mandatory. If you have the prospect's address, an email: that is the whole idea of a multichannel campaign. Or a manual task, such as “call the prospect”.
And there is a limit worth knowing before you write that InMail: LinkedIn does not let you send a second InMail to someone who did not reply to the first. So that branch holds exactly one shot, which changes the way you write it.
If you put nothing under Not accepted, prospects who did not accept in time simply leave the campaign. That is a valid choice, as long as you make it on purpose.
And without an acceptance condition?
If your campaign is pure LinkedIn, with no email and no InMail, you do not need this condition. Put Send a message on LinkedIn directly below the connection request. The message then waits for the acceptance for as long as the campaign runs, and goes out once its delay has passed: it does not fail, it waits.
It is the simplest build, with one trade-off: nothing closes the path of a prospect who never accepts. A request left unanswered for 30 days stops holding the campaign back, which switches to Finished at the daily check, once nothing else is scheduled and there has been no activity for 24 hours. Until then, you live with long campaigns whose dashboard no longer tells you much.
Waiting for the acceptance only works if the message comes directly after the connection request. Slip a profile visit or a like in between, and the message will try to reach someone who is not connected to you yet: LinkedIn refuses it, and the following steps stay stuck. If you want those gestures, place them after the first message.
The other condition that causes confusion: if the person replies
There is a condition called If prospect replies on LinkedIn, and it is the one that produces the most pointless constructions. The reason is simple: it looks like it does what the campaign already does on its own.
A reply on LinkedIn always stops the prospect's sequence, whatever your settings. Yet you regularly see sequences built like this: a message, then an “if the person replies” condition, with the No branch running the next message and the Yes branch going to an end of campaign. It serves no purpose: you have drawn by hand what already existed by default, and you have made your sequence twice as hard to read.
If your goal is a connection request followed by three messages, stopping when the person replies, build it linear: the request, then the three messages below it, no conditions. It works exactly the way you want, and it is the most readable build when you reopen the campaign three weeks later.
Step 11: the follow-up messages
Then add a second message, and a third, with the + below each step. If the person still has not replied after the third, that is where the side gestures find their place: a like on their latest post, a profile visit, then a new message.
Two more steps exist to vary things: Send an InMail, for Premium or Sales Navigator accounts only, and Send a voice note, an audio message you record or upload (five minutes at most). The campaign will not launch while the recording is missing.
The content of these messages follows the same rules as a cold email, only shorter.
1234- 1Send a message on LinkedIn: your follow-ups.
- 2Like a post: the prospect's latest post.
- 3Send an InMail: Premium or Sales Navigator.
- 4Send a voice note.
Writing a good LinkedIn message
The fundamentals do not change: be clear, direct and short, and ask a question that can be answered in one line. Everything that holds for a cold email holds here, and this page will not repeat it.
What matters are the differences, and they run deeper than people think.
| In cold email | On LinkedIn | |
|---|---|---|
| Signature | Essential, it carries your identity | Drop it: your name is already shown above the message |
| Sign-off | Expected | Avoid it: it closes the conversation |
| Your company | Worth mentioning | Pointless: it is on your profile, one click away |
| Social proof | In the message | On your profile, not in the message |
| Length | Short | Even shorter |
| Register | A letter | A conversation |
The most important line in that table is the first one, and it is the one people get wrong most often. Do not sign your LinkedIn messages. No “best regards”, no “have a good day”, no name at the bottom.
The reason is not cosmetic. A LinkedIn message is a conversation, not a letter. When you write “best regards” and sign off, you signal that your turn is over and the exchange is closed, when your whole goal is to leave the door open. A message that ends on a question with no sign-off calls for a reply; a signed message reads like a document.
Same logic for your company and your references: keep them out of the message. Anyone interested will click through to your profile, and that is precisely where it all plays out.
Your profile does half the work
In cold email, once you put a link to your website, the real question becomes: does your website hold up? On LinkedIn it is exactly the same, only much simpler. There is no website to build, there is a profile.
And that profile gets looked at every single time. Someone who receives your connection request or your message will click your name before deciding anything. What they find there weighs more on your reply rate than the wording of your message.
The things to check before you launch anything: a banner that is not the default one, a real professional photo, a description that says what you do and who for, more than five hundred connections, regular posts on the subject you sell, and a career history consistent with what you offer.
It is the most neglected piece of LinkedIn outreach, and one of the most profitable: you do it once and it serves every campaign you run.
Message spacing: LinkedIn is not a mailbox
This is the blind spot of almost everyone doing outreach on LinkedIn, and it comes from a very human bias: the people running LinkedIn outreach are on LinkedIn every day themselves. They assume their prospects are too.
Most of them are not. Plenty of people open LinkedIn once a month, often because LinkedIn emailed them to say they have messages waiting.
Picture what that person sees when they finally log in. Your first message. Then the second, sent three days later. Then the follow-up. Then the one where you write that you never heard back and you will leave it there. All of it at once, on the same screen. You have played out and closed an entire conversation with someone who had not read a word of it.
That is the fundamental difference with email: an email lands in a mailbox people open every day, a LinkedIn message waits for them to come back. Nothing guarantees it has been seen.
So space your messages out far more than in email. Unless you know your target is active: when exporting from Sales Navigator you can filter on profiles that posted in the last thirty days, and those are people who will come back soon.
How many follow-ups, and why fewer than in email
Three messages at most, and possibly a fourth much later. That is fewer than in email, and it is no accident.
The reason is arithmetic. A LinkedIn account's daily volume is counted in tens of actions, connection requests and messages together. Every follow-up sent to someone who does not reply is a slot taken from a prospect you have not contacted yet.
In email, one more follow-up costs almost nothing. On LinkedIn, you pay for it directly in new contact volume. Ask yourself at every step: is this fourth message worth more than a new connection request?
A last word on a very common fear. You regularly read accounts along the lines of “I automated with this tool and my account got blocked”. In reality, on a normal, established LinkedIn account used within these limits, that almost never happens.
The cases you hear about nearly all look the same: accounts created from nothing, brand new, with automation launched on them straight away. There, yes, LinkedIn reacts fast. A real account, with a history and a network, does not get restricted for sending twenty connection requests a day.
Tracking the results
Once the campaign is live, the Performance tab, at the top right of the builder, shows how each step is progressing and what it produces: connection requests, acceptances, replies. Replies are read and handled in the Inbox, on the LinkedIn side.
Two ratios are enough to judge a campaign: the acceptance rate (acceptances divided by requests) and the reply rate (replies divided by acceptances). Allow for requests still pending before drawing conclusions: the ones from the last few days have not had time to be accepted, or detected.
If acceptance is low, the lever is rarely the message: look at your profile, your targeting and your connection note first, or the lack of one.
Frequently asked questions
The questions we get asked on this topic, answered briefly.
How long does it take for an acceptance to be picked up?
Anything from a few hours to about two days. Emelia does not watch LinkedIn continuously, to protect your account: it checks for new connections when the account performs other actions, and at least every two days. That is why the acceptance condition should wait five days.
What happens if the prospect accepts after the condition's wait time?
They stay in the Not accepted branch: once the wait is over, the condition has decided and the prospect no longer switches branch. That is the reason to keep a generous wait, five days.
Does a prospect who replies on LinkedIn still get my messages?
No. A reply on LinkedIn always stops that prospect's sequence in the campaign, whatever your settings. Watch out for messages you send by hand from LinkedIn, though: they are not seen as a reply, and the campaign will still send its own.
What happens to a prospect who is already in my network?
The connection request step is skipped, they immediately count as accepted, and the sequence moves on.
Can I run several campaigns on the same LinkedIn account?
Yes, but their limits add up: two campaigns set to 20 connection requests a day on the same account will send 40. Split them yourself to stay within your account's limits.
Do I need Sales Navigator to prospect on LinkedIn?
No. A free account is enough to send connection requests and message your connections. Sales Navigator is used to pull very targeted lists and gives you InMail; Premium or Sales Navigator also let you go up to 40 connection requests a day.