Create a cold email campaign, step by step
From creating the campaign to the last setting before you send, screen by screen. Cold email takes three workstreams, and only one of them sets the schedule.
The three workstreams, and which one to start first
A cold email campaign rests on three independent things, which you can prepare in parallel:
- Sending mailboxes able to land in the inbox. This is the longest workstream, and the one that sets your launch date: you need to buy a domain, set up authentication and warm the addresses up for two to three weeks. Start there the day you decide to go.
- A contact list that is fresh and well targeted. A few hours of work, and it can be fixed right up to the last minute.
- A message sequence that makes people want to reply. You can write it while the mailboxes warm up.
Step 1: create the campaign
In the left-hand menu, open Campaigns, then click New campaign at the top right.
 12
12- 1Open Campaigns in the left-hand menu.
- 2Click New campaign.
Step 2: start from scratch or from a template
A window opens. Give the campaign a name: it is how you find it in the list, your prospects never see it, and you can change it later. Then pick your starting point.
From scratch gives you an empty canvas that you fill step by step. Templates offers five ready-made sequences. A template sets the structure and the delays, never the copy: every step comes in empty, and you write each message yourself. Afterwards you can change anything, add or remove steps, adjust the delays.
Here is what each of the five templates contains, as it is built in Emelia:
| Template | What it contains | Who it is for |
|---|---|---|
| Pure Cold Email | Five emails: the first one at launch, then follow-ups 3, 5, 10 and 25 days apart. No conditions. | You have verified emails for your whole list. This is the template this page follows. |
| Pure Linkedin (for basic account) | A connection request without a note, a message 1 day after acceptance, a second one 3 days later, a like on the latest post 7 days after that, then a last message right after. No conditions. | You have LinkedIn URLs but no emails, on a free account. |
| Pure Linkedin (for Premium Account) | A connection request, then the “invitation accepted” condition with a 5-day wait. Accepted: three messages (2 hours, 5 days, 10 days). Not accepted: an InMail, a like, then a message. | LinkedIn Premium or Sales Navigator accounts, needed for InMail. |
| LinkedIn then Email | The connection request and its messages first, then emails for the people whose address you have. Eleven steps on the longest path. | You have everyone's LinkedIn, but only some people's email. |
| Email then LinkedIn | A first email with bounce detection, then LinkedIn or an email follow-up depending on whether a LinkedIn profile exists. | You have everyone's email, but only some people's LinkedIn. |
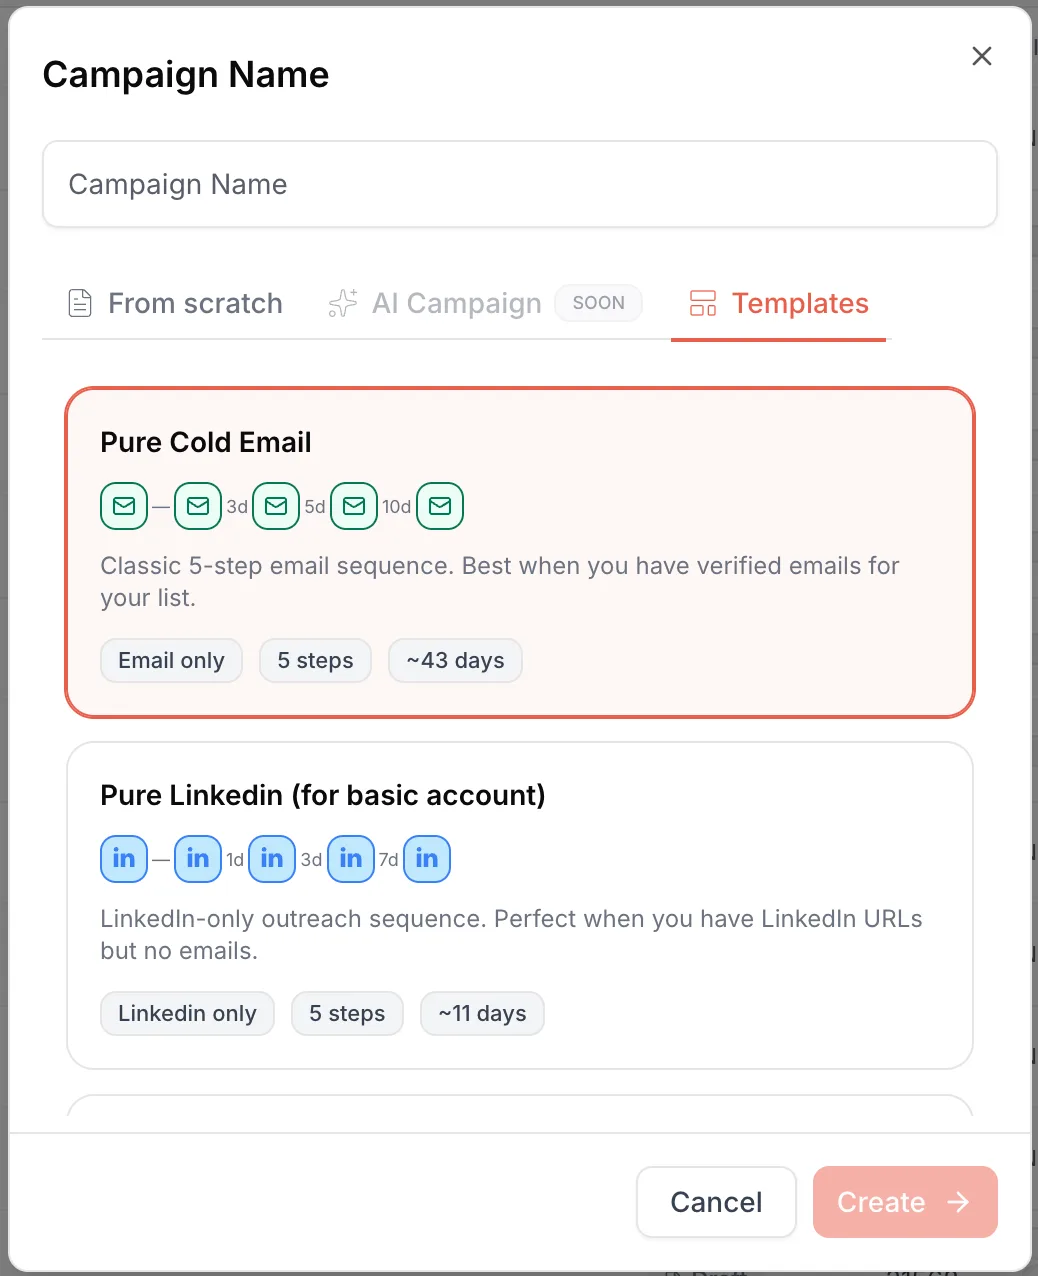 123456
- 1The Campaign Name, which you can change later.
- 2From scratch: an empty canvas.
- 3Templates: five ready-made sequences.
- 4Pure Cold Email: five emails, about 43 days.
- 5The LinkedIn and multichannel templates follow further down the list.
- 6Create opens the campaign builder.
The “~43 days” or “~15 days” badge gives you an order of magnitude. The real duration depends on your sending days and, for LinkedIn, on when each prospect accepts the request.
Step 3: switch the panel to Email mode
The builder opens: the sequence canvas on the left, the Campaign Settings panel on the right. At the top of that panel are three tabs: Advanced, Email and Linkedin.
There is only one campaign builder in Emelia, but if you are doing pure cold email, click Email. The LinkedIn settings disappear from the panel, and the add-step menu only offers email steps: everything becomes easier to work through.
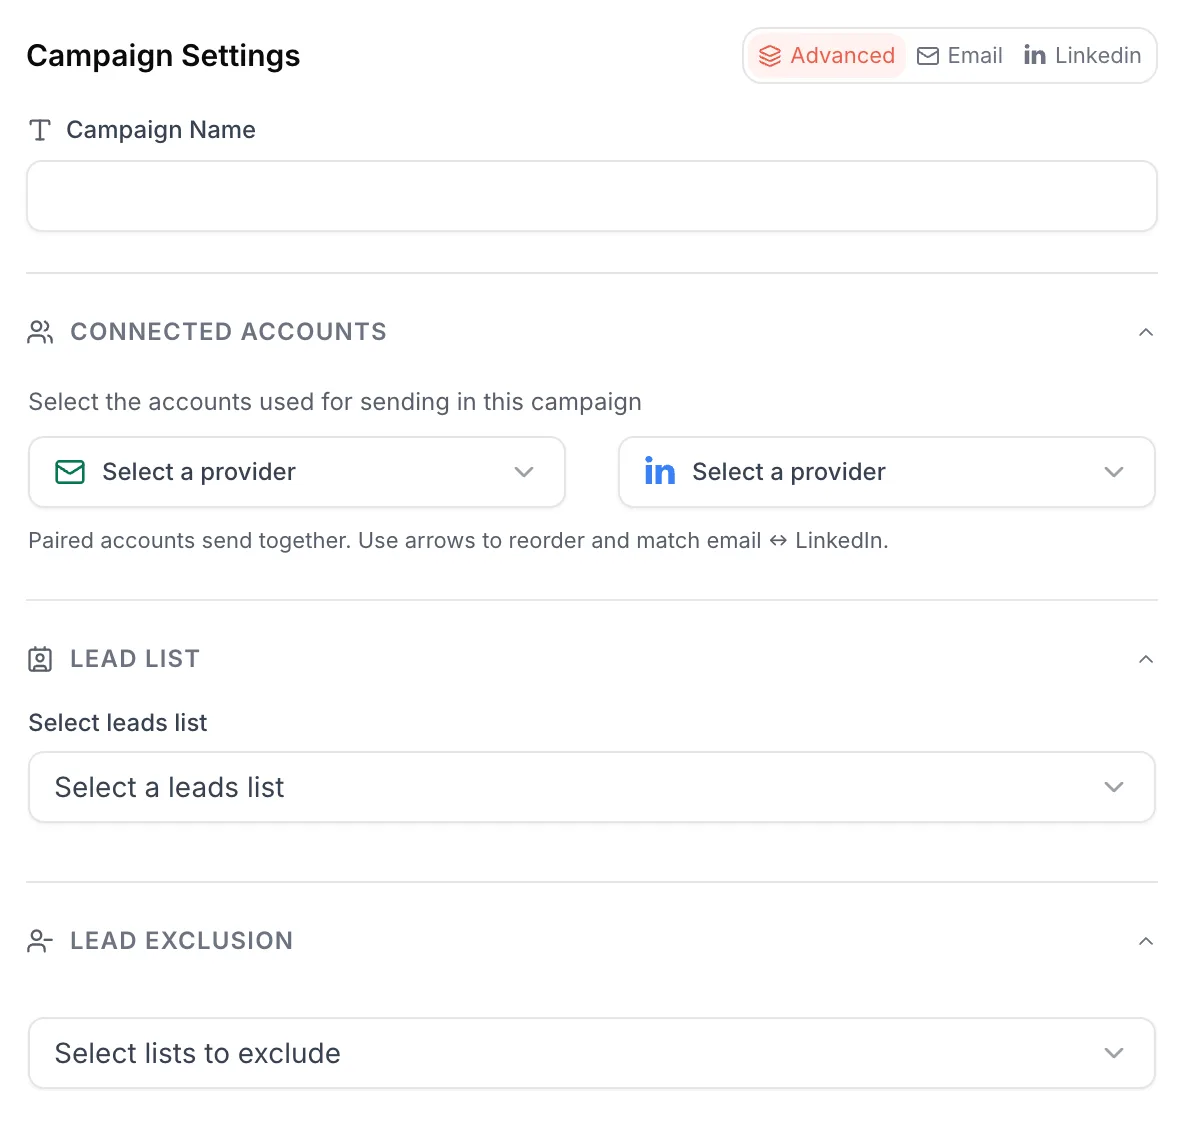 1
1- 1Click Email to show only the email settings.
Email mode hides settings, it does not erase any, and it is not saved: every time you reopen the campaign, the panel goes back to Advanced. One detail worth knowing for later: the condition based on variables only shows up in Advanced mode.
Step 4: choose your sending mailboxes
Under Connected accounts, click Select a provider and tick the mailboxes that will send the campaign. You can pick several: each contact is assigned a mailbox at the start, then all their follow-ups go out from the same address, in the same thread.
If you have not connected a mailbox, set up your signature or configured your tracking domain yet, now is the time. These settings are done once and serve every campaign.
1- 1Select a provider: tick one or more sending mailboxes.
This is the point everybody misses. The limits set further down apply per mailbox, not to the campaign as a whole. With 100 emails a day and three mailboxes, the campaign can send 300 emails a day. Do the multiplication before you launch, otherwise you will discover your real volume the next morning.
Once the campaign is running, each contact stays tied to the mailbox that sent them the first email. Removing that mailbox from a running campaign leaves its contacts without their follow-ups.
Step 5: select your contact list
Under Lead list, two cases. Either you have already imported a list, and you just select it. Or you do not have one yet, and you click Create a new list: CSV file, Sales Navigator, HubSpot or Pipedrive.
You can select several lists in the same campaign. A contact who appears in two of them only receives the sequence once: the campaign recognizes them by their email address, or by their LinkedIn URL when they have no email.
1- 1Select a leads list, or create a new one.
Above that, the launch is refused. With a bigger file, spread it over several identical campaigns: duplicate the first one without its contacts, then attach the rest of the list.
Step 6: exclude lists
Just below, Lead exclusion lets you point to lists that must not be contacted: existing customers, prospects already worked in another campaign, a colleague's contacts. Any contact from your lists who also appears in an excluded list, by email or by LinkedIn URL, is removed from the campaign.
This becomes essential as soon as you run a second campaign: nothing is deduplicated automatically from one campaign to the next, by design, since you may want to get back in touch with someone.
Not to be confused with the blacklist, which lives in your account settings and applies to every campaign: that is where you block a domain or an address once and for all.
1- 1Select lists to exclude.
Step 7: sending days and hours
Open the Time block. This is where you set the Time zone, the Active days, and the Start time and End time of your sends. By default: Monday to Friday, 8 a.m. to 5 p.m.
Emelia spreads the day's sends across the whole window, nothing ever goes out in bulk. A short window does not lose you any volume, it squeezes your sends together, which is worse for deliverability: prefer a wide window, 8:30 a.m. to 5:30 p.m. for example.
Pick your prospects' time zone, not yours. There is only one per campaign: if your target spans several countries, choose a middle time zone and a wide window.
 1
1- 1Time: time zone, active days, start and end times.
A 3-day delay between two steps counts the days you ticked, not calendar days. With only Tuesday, Wednesday and Thursday ticked, a 6-day delay lasts about two weeks. Public holidays are not handled automatically: pause the campaign, untick the day, then resume it.
Step 8: sending limits
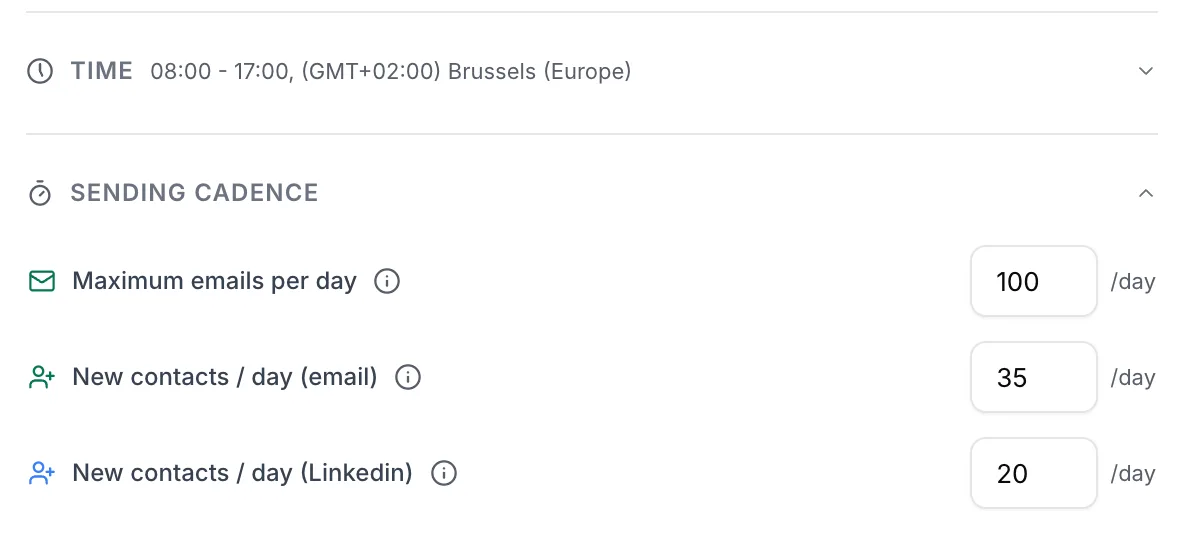
In Sending cadence, two settings concern email, and mixing them up is the number one cause of a badly calibrated campaign. New contacts / day (email) counts the people the campaign writes to for the first time. Maximum emails per day counts every email that goes out, first messages and follow-ups together. Both apply per mailbox.
Once your mailboxes are warmed up, our recommendations are 35 new contacts per day and 100 emails per day in total, per mailbox. These are also the default values.
Why two numbers so far apart? Because a sequence stacks its steps. On day one, the campaign sends 35 first messages, and that is all. A few days later, it sends the second messages to those 35 contacts while starting 35 new ones: you are at 70 emails in the day. Then 105 when the third step kicks in, and so on.
That is why you should not be greedy with new contacts. If the running total goes above the daily limit, Emelia has no choice but to delay steps, and your follow-ups lose the rhythm you planned. The panel warns you, by the way, if your new contacts equal or exceed your maximum emails.
The third line, New contacts / day (Linkedin), only concerns LinkedIn steps: it disappears in Email mode.
123- 1Maximum emails per day, follow-ups included, per mailbox.
- 2New contacts / day (email), per mailbox.
- 3The LinkedIn setting, hidden in Email mode.
You will read far lower recommendations elsewhere. That is not absurd, but it cannot be judged in isolation: the volume you can hold depends on your personalization, the quality of your list and how varied it is. If you would rather stay at fifteen or twenty emails per mailbox, go ahead, it will cause no problem at all.
Limits are set campaign by campaign: there is no global cap per mailbox. A mailbox used in two campaigns set to 100 can send 200 emails a day. If you share a mailbox, split the volumes yourself, for example 50 and 50.
That is a very good practice, and it changes the numbers: warm-up and the campaign share the same mailbox, so the same daily volume. Warm-up uses about 25 emails a day. Come down to 25 new contacts and 75 campaign emails per day: with warm-up, you stay around 100 emails a day per mailbox.
Step 9: when the sequence stops for a contact
Scroll down the panel to Condition to stop. This block decides which event takes a contact out of the sequence. By default, Replied email and Replied linkedin are on: as soon as a prospect replies, they receive nothing more from this campaign, whatever their reply says. That is the behavior you want in almost every case.
Opened email and Clicked link are off, and that is for the best: as the tooltip says, these signals are not 100% reliable, since a firewall or a security filter can open the email or click a link instead of the recipient.
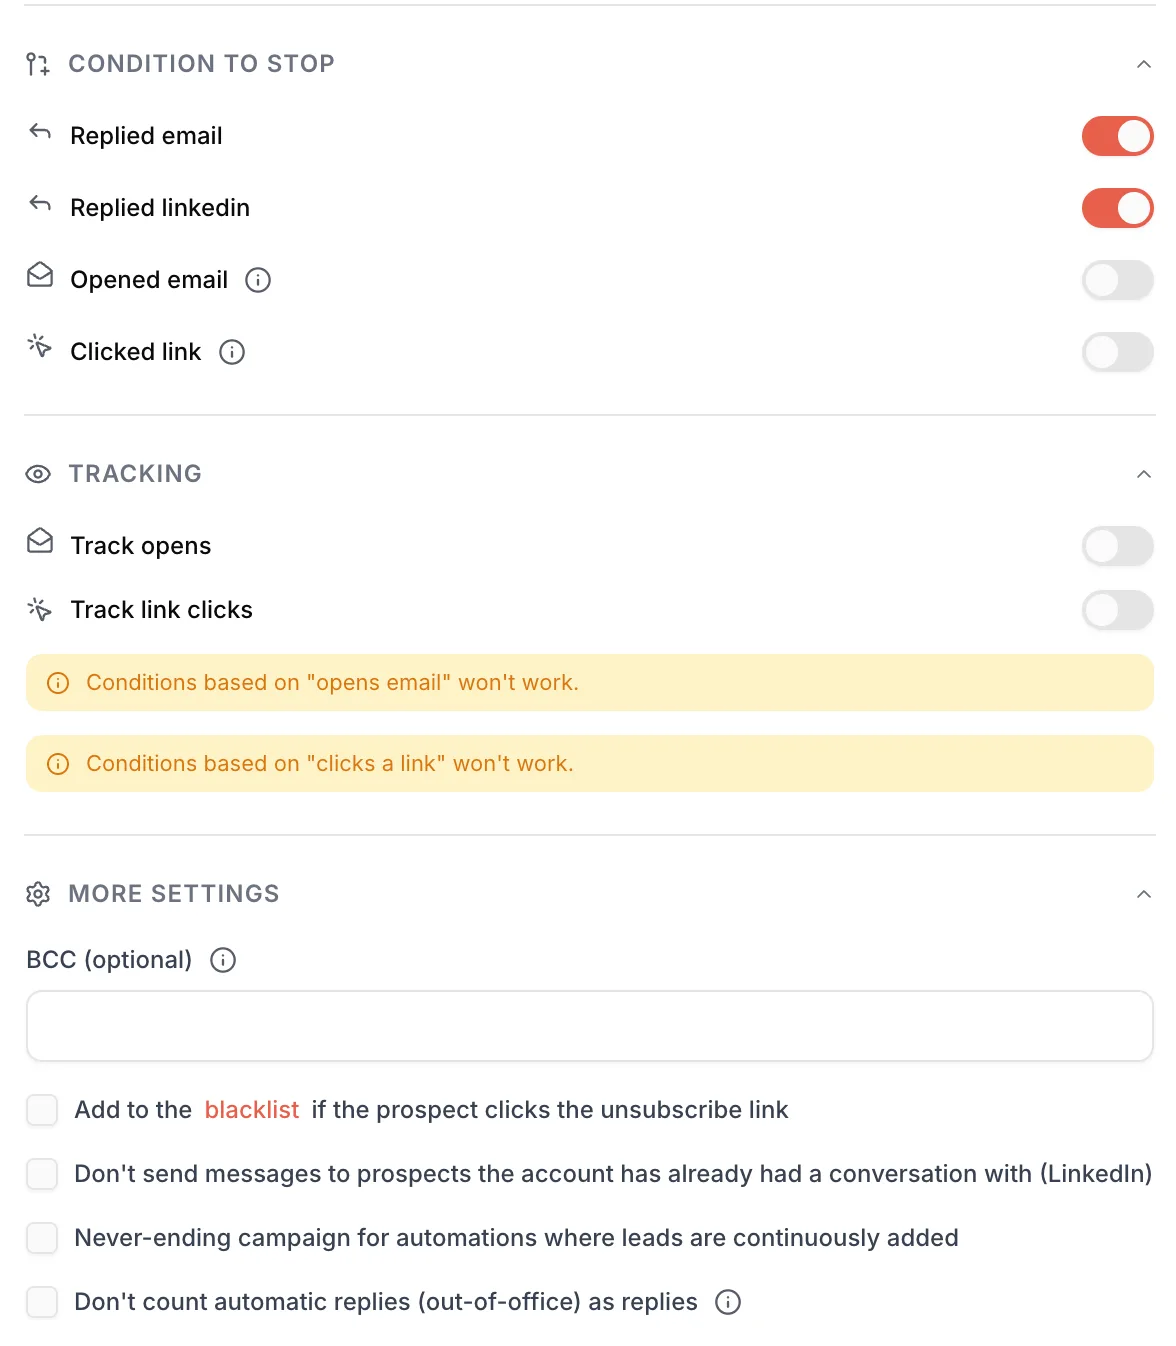 12
12- 1Replied email and Replied linkedin: on by default, keep them.
- 2Opened email and Clicked link: off by default.
The reply takes the contact out of the current campaign. If they are in another campaign, that one carries on. To never write to someone again, add their address or domain to the blacklist. Also note that Emelia picks up replies about once an hour: a follow-up scheduled within the hour after a reply can still go out.
Step 10: open and click tracking
The Tracking block holds two switches: Track opens and Track link clicks. They are off by default on a new campaign.
As long as they stay off, two yellow alerts tell you that conditions based on opens and on clicks won't work: an “If prospect opens Email” condition would then send everyone down the No branch. For a straight sequence with no conditions, these alerts do not concern you.
If you turn tracking on, set up your own tracking domain: it carries the links and the measurement pixel of your emails.
12- 1Track opens and Track link clicks.
- 2The alerts: without tracking, open and click conditions do not work.
If your prospects reply but the campaign shows a 0% open rate, look at this block first: without open tracking, Emelia cannot measure anything.
Step 11: the other settings
The last block, More settings, groups options that are useful in specific cases:
- BCC (optional): an address in blind copy of every email sent, often your CRM's so it keeps a record. Be aware, as the tooltip says, that it skews the open rate.
- Add to the blacklist if the prospect clicks the unsubscribe link: unticked by default. When ticked, the unsubscribed address joins your account's blacklist, and no campaign will write to it again. Without it, the person still leaves the current campaign.
- Don't send messages to prospects the account has already had a conversation with (LinkedIn): only concerns LinkedIn messages. It disappears in Email mode.
- Never-ending campaign: for a campaign that is fed continuously (automation, API, synced list). It never switches to “finished” on its own.
- Don't count automatic replies (out-of-office) as replies: unticked by default. When ticked, an out-of-office message no longer stops the sequence, and the follow-ups carry on. Emelia recognizes these replies by their technical headers and their subject line, never by their content: a “stop” typed by hand is still a real reply.
12345- 1BCC (optional): blind copy, to your CRM for example.
- 2Automatic blacklist when the unsubscribe link is clicked.
- 3A LinkedIn-only option, hidden in Email mode.
- 4Never-ending campaign, for lists that keep growing.
- 5Out-of-office replies are not counted as replies.
Without it, a plain out-of-office message counts as a reply: the prospect leaves the sequence without having read anything. During the holidays, that can be a sizeable share of your list disappearing this way.
Step 12: build the sequence
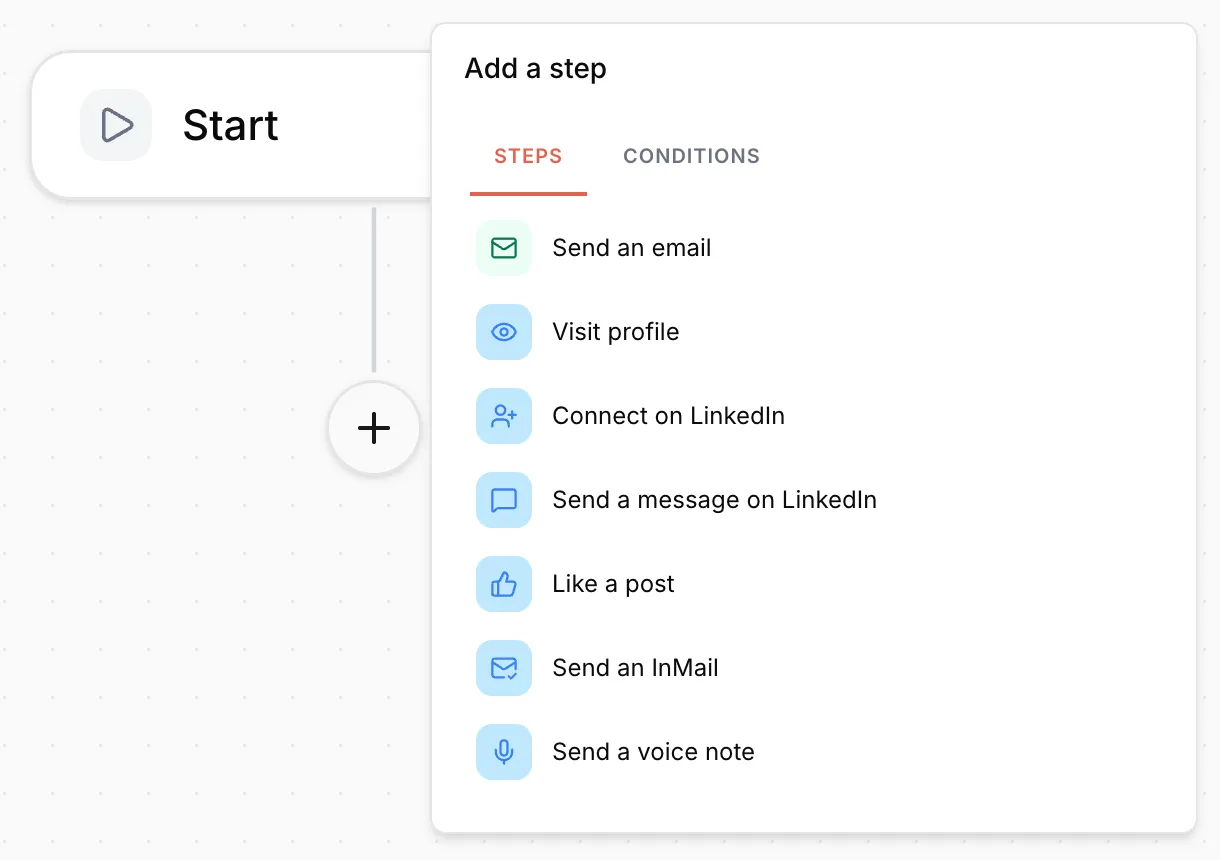
On to the canvas on the left. At first it only holds the Start block: click the + below it to place your first step. The Add a step menu opens, with two tabs: Steps, which carry out an action, and Conditions, which route the prospect according to what they did or to their data.
Pick Send an email. Do it again with the + below that step to add the next follow-up, and so on. Each new step comes with a one-day delay, which you change by clicking on it. The first email goes out as soon as you launch.
In Email mode, the menu only shows what concerns you: Send an email, Manual task (an action you will do yourself, a call for example) and End of campaign. In Advanced mode, as in the screenshot, you also see all the LinkedIn steps.
And here is the advice that will save you the most time: for plain cold email, do not tie yourself in knots over conditions. Four or five email steps one after the other, well-set delays, and you are done.
 123
123- 1Click the + below the last block.
- 2Steps tab: the actions.
- 3Send an email: the basic step of an email campaign.
This is the most common build mistake, and it comes from a good intention. The stop conditions from step 9 already take care of it: as soon as a prospect replies, the sequence stops for them. Four email steps in a row are enough, the rest is handled.
Understanding conditions
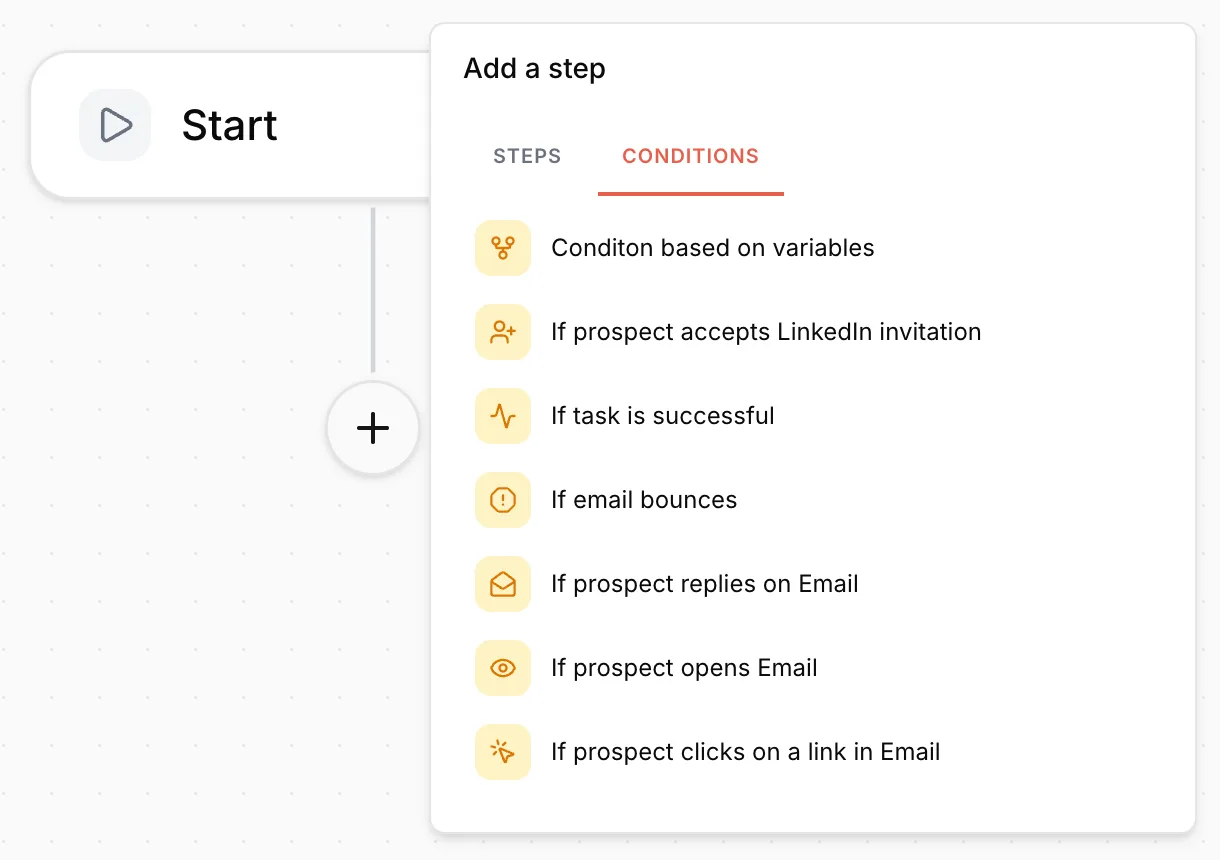
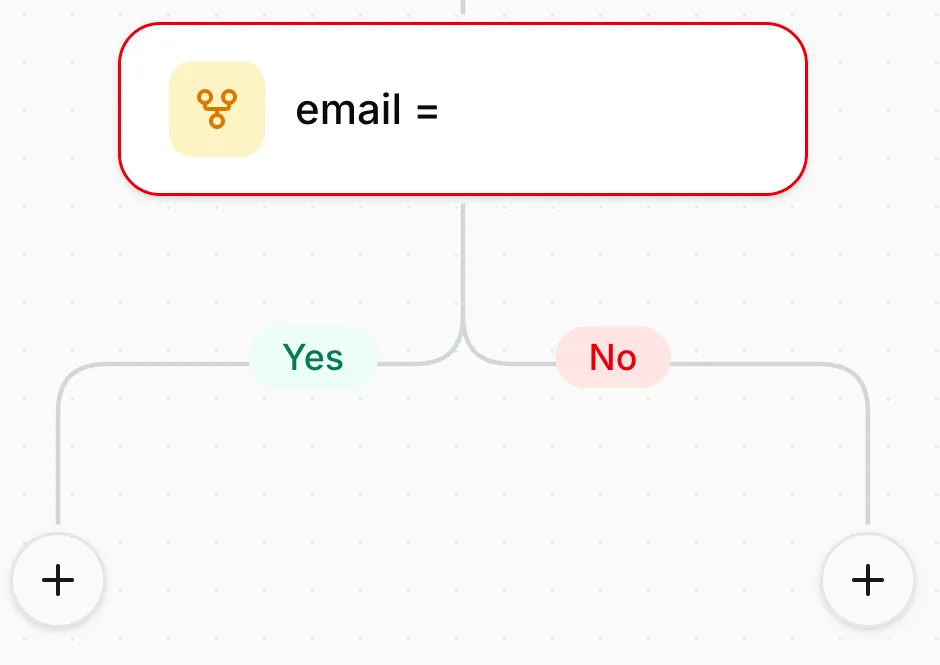
A condition is a switch: it asks a question about the prospect and sends them down the Yes branch or the No branch, each with its own follow-up steps. You find them in the Conditions tab of the same menu.
There are two families. Conditions on an event wait for something to happen after a step, during a Maximum wait time that you set. If the event happens within that time, the prospect goes down the Yes branch as soon as Emelia detects it; otherwise they go down the No branch when the wait ends, and they never come back. The condition based on variables, on the other hand, reads the contact's data and decides immediately, with no waiting.
On the email side, here are the event conditions. Each one must sit directly after the email step it watches, with no other step in between: otherwise it cannot find the send it refers to, and the contact gets stuck.
- If email bounces: the recipient's server refused the address. Useful to move those contacts over to LinkedIn.
- If prospect replies on Email: only useful if you turned off the stop on email reply. With the default setting, a prospect who replies leaves the sequence and the Yes branch has nothing to run.
- If prospect opens Email and If prospect clicks on a link in Email: they need open or click tracking (step 10), and stay approximate because of automatic opens and clicks.
- If prospect unsubscribes: further down the list, like If prospect replies on LinkedIn on the LinkedIn side.
 1234
1234- 1Conditions tab.
- 2Condition based on variables: reads the contact's data.
- 3If prospect accepts LinkedIn invitation: covered on the LinkedIn page.
- 4The conditions tied to an email you sent.
A new condition comes with a one-day wait. Replies and bounces are picked up about once an hour: aim for at least a day for a reply or an open, never a few minutes. For a LinkedIn connection request being accepted, count five days instead.
Conditions based on variables
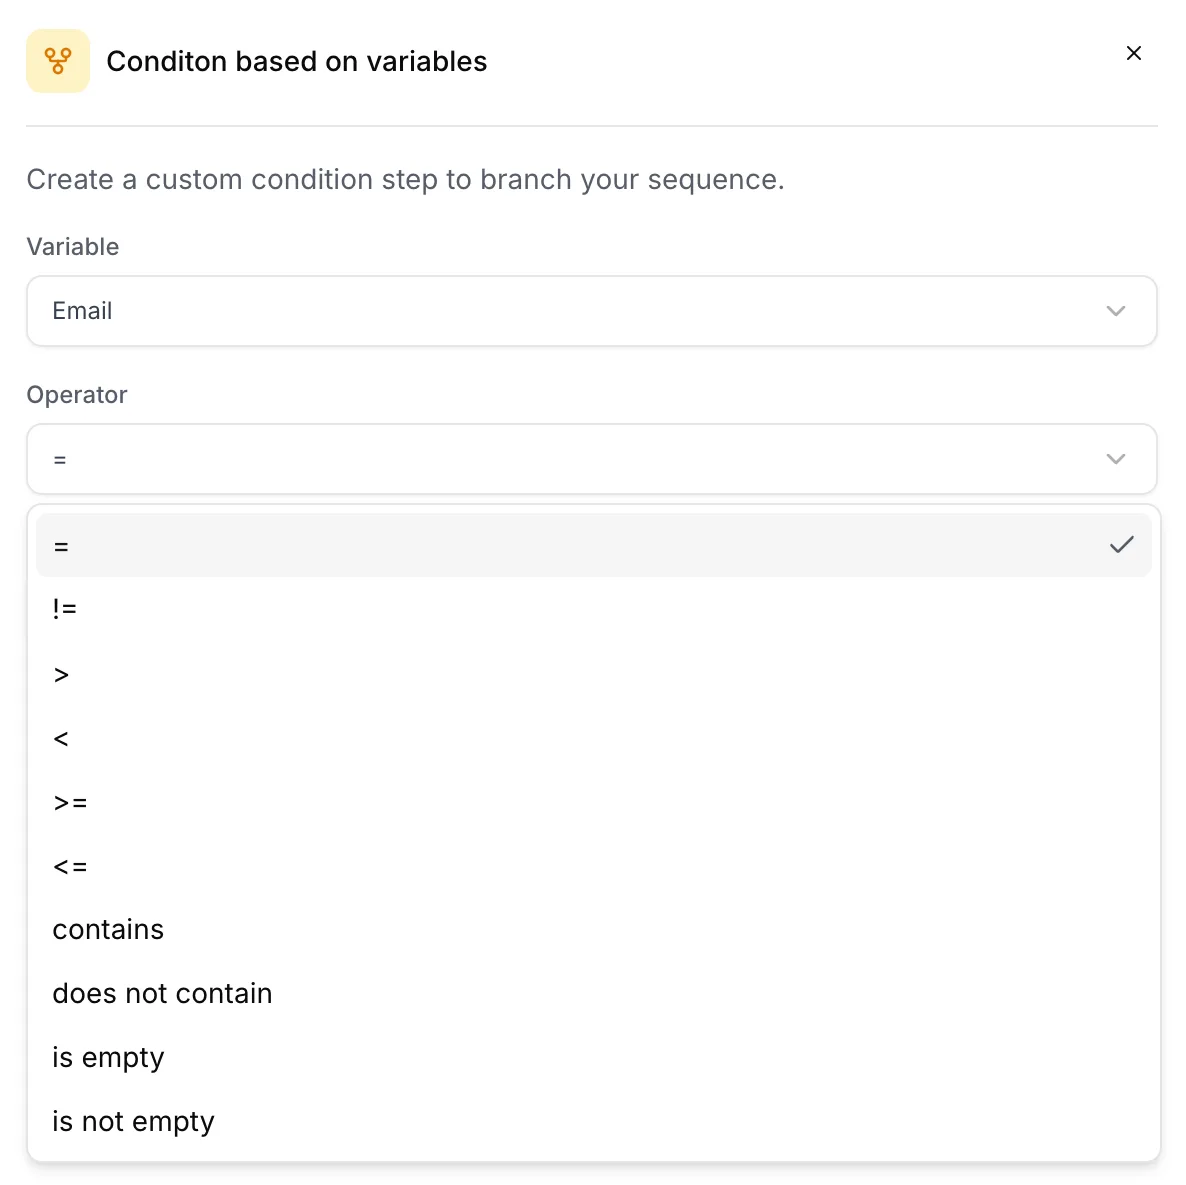
This is the most useful condition, and the least known. It looks at one piece of the contact's data, a column of your list, and routes them according to its value. Add it from the Conditions tab (in Advanced mode, it does not appear in Email mode), then set three fields in the right-hand panel:
Variable: the column to test. The menu first lists the standard fields under their technical name (First Name, Email, Job Title, Linkedin Url Profile…), then the custom columns of the lists attached to the campaign. A variable that none of your contacts has filled in is greyed out at the bottom of the list. Operator: how to compare. Value: what you are looking for. That last field disappears for “is empty” and “is not empty”.
| Operator | What it checks | Example |
|---|---|---|
| = | The value is exactly the one entered, down to the character and the capital letters. | Segment = SMB |
| contains | The value contains the text entered, capital letters included. | Job Title contains CEO |
| does not contain | The value does not contain that text. An empty field counts as “does not contain”. | Job Title does not contain Intern |
| is empty | The field is not filled in for this contact. | Email is empty |
| is not empty | The field is filled in. | Linkedin Url Profile is not empty |
 12345
12345- 1The condition, placed below the previous step.
- 2Yes branch: the condition is true.
- 3No branch: the condition is false.
- 4Each branch's + adds its own steps.
- 5A branch left empty ends the sequence for those contacts.
 123
123- 1Variable: the column to test.
- 2Operator: how to compare.
- 3The operators on offer: stick to the five in the table above.
Three examples that really earn their keep:
Switch to LinkedIn when the email is missing. At the top of the sequence, “Email is empty”: the Yes branch starts with a LinkedIn connection request, the No branch with your emails. It is the best protection against contacts with no address, whom an email step would take out of the campaign.
Fit the message to the job title. “Job Title contains CEO”: the Yes branch gets a message written for a founder, the No branch a more hands-on one. Think about how titles are written in your file (“CEO”, “Ceo”, “Chief Executive Officer”): the comparison is case-sensitive.
Sort by segment. Add a column to your file before importing it, a company size band or a priority for instance, then test it with “=”: each segment gets its own sequence inside a single campaign.
Stick to the five operators in the table, and test your condition on two or three contacts whose answer you already know before you launch.
- The menu also offers !=, >, <, >= and <=: for now, a condition using them sends every contact down the No branch.
- The company fields in the list (Industry, Company Size…) are not read by conditions: to sort by size or industry, use a custom column from your file.
- Preferably place these conditions at the top of the sequence, right after Start.
Step 13: write the message inside a step
Click a step to open it. Two areas are waiting: the Email subject, then the body of the message.
In the subject line, you can insert variables, meaning the columns of your list, and some spintax to vary the wording from one send to the next. The first email must have a subject. The follow-ups go out in the same thread.
In the body, type your message. To insert a variable, click Add variable or type a forward slash: the suggestions appear under the cursor, along with the signature, your templates and attachments.
Do not forget the signature at the end. It is the one you set up for your mailbox, with your name, your company and your job title.
The Add version button creates a variant of the same email, to compare two wordings on one step.
A word about attachments, which you will see in the suggestions. People asked us for this feature for years, so we built it. But offering it does not mean recommending it: in cold outreach, an attachment is one of the most expensive mistakes you can make for your deliverability. If you have a document to share, put in a link.
A first name missing from your file produces a “Hi ,” that goes out exactly like that, with no error and no warning. That is exactly what the preview and the test email let you catch before sending. Plan a fallback for the first name.
The order matters, and plenty of people find that out too late. As long as no list is attached, the editor only offers the standard variables and ignores the custom columns in your file. You also cannot preview or test your emails on real contacts. List first, writing second.
Step 14: test, then launch
Five minutes that catch the mistakes you stop seeing after too many rereads: a misspelled variable, a dead link, a missing signature, a stray “Hi ,”. In every email step, Send a test email sends it to you with the data of a real contact from the list. Run it from the last step to see the whole thread.
When everything is ready, click Launch the campaign, at the top left of the builder. The ⋮ menu right next to it offers Schedule launch, to pick the date and time of the first send.
If something is missing, the launch is refused with a message saying what to fix: no mailbox selected, no contacts, an empty email, a first email with no subject, or no contact with an email address in the list.
 12
12- 1Launch the campaign.
- 2The ⋮ menu: Schedule launch.
Once it is running
To change a running campaign, pause it first: while it runs, its settings and steps are locked. You can then fix the copy, the delays and the settings, and add steps at the end of the sequence. When you resume, Emelia reschedules everything, taking into account what each contact has already received.
Two situations then keep coming back. The campaign sends nothing, and there are a handful of possible causes, nearly always configuration. Or it finishes, and all those contacts who never replied are still sitting there: going back to them always costs less than building a new list.
A contact deleted then re-imported is seen as a new contact: they start again from the first step and receive the first email a second time. To add contacts, add them to the list already attached to the campaign: they enter at the first step, without touching the others.
How long before the first meeting
You work the numbers backwards. Count roughly a hundred delivered emails for one meeting. At thirty-five new contacts per day per mailbox, a single mailbox reaches a hundred people in three sending days; the full sequence, follow-ups included, then takes several weeks to play out.
Add the two to three weeks of warm-up beforehand, and you have the honest answer: between the day you buy the domain and the first meeting, count on six weeks or so. Anyone promising you better is not counting the warm-up.
Frequently asked questions
The questions we get asked on this topic, answered briefly.
Why does my campaign send less than the limits I set?
Because they are ceilings, not targets. On the first day, the allowance is worked out on what is left of the sending window. Follow-ups only go out once their delay has passed, in sending days. And towards the end of the sequence there are no new contacts left to start: the volume naturally drops. If nothing goes out at all, that is another story: see my campaign sends nothing.
Does a mailbox used in two campaigns send twice as much?
Yes. Limits are set per campaign, with no global cap per mailbox: two campaigns set to 100 emails a day on the same mailbox can send 200. Split the volume yourself, for example 50 and 50.
How many contacts can a campaign hold?
30,000 at most: above that, the launch is refused. With a bigger file, spread it over several identical campaigns.
Does a contact who is in two lists get the email twice?
No, not within one campaign: it recognizes the contact by their email address, or by their LinkedIn URL if they have no email, and keeps them only once. Between two different campaigns, however, nothing is automatic: use lead exclusion.
Is open tracking on by default?
No. On a new campaign, open tracking and click tracking are both off. Turn them on in the Tracking block if you want those statistics, or if your sequence contains a condition on opens or clicks.
Do the delays between steps count weekends?
No. Delays in days are counted in sending days, the ones you ticked in the Time block. Sending Monday to Friday, a 3-day delay set on a Friday leads to the following Wednesday.
Can I edit a campaign that is already running?
Yes, after pausing it: copy, delays, settings, and adding steps at the end of the sequence. When you resume, each contact picks up where they were. Avoid inserting or deleting a step in the middle of a sequence that has already started, though, as it can throw off the path of contacts who are further along.